A concrete coating can fail fast if moisture is still in the slab. Before I install or schedule a coating, I need to check 5 things: slab age, vapor barrier and indoor conditions, recent rain or snowmelt, visible damp spots or cracks, and moisture test results.
Here’s the short version:
- Don’t assume 28 days means dry. Concrete may cure in that time, but drying can take much longer.
- Watch recent weather. Rain, snowmelt, and indoor humidity in the 70%–80% range can affect slab moisture.
- Look for warning signs. Dark patches, damp cracks, and white powdery residue can point to moisture movement.
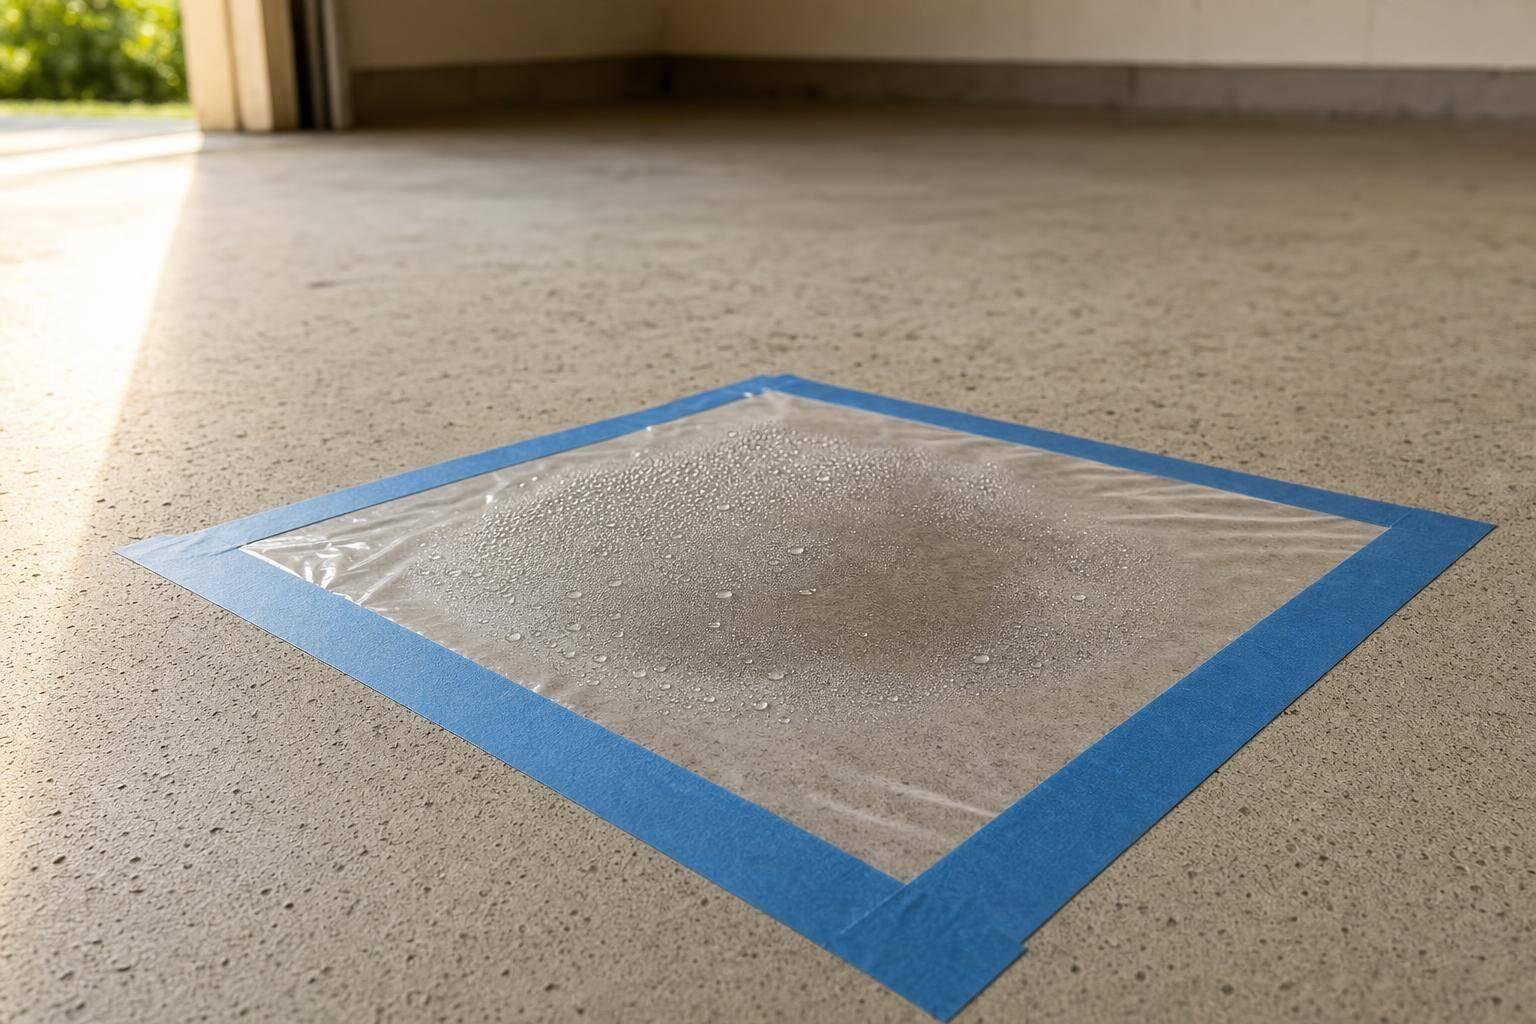
- Use a plastic sheet test as a basic check. Tape down a clear 18 in. x 18 in. to 24 in. x 24 in. sheet for 16–24 hours in at least 2–4 spots.
- Ask for RH and MVER testing. RH shows moisture inside the slab. MVER shows moisture leaving the surface.
- Wait if readings are too high. Delaying the job often costs less than grinding off a failed coating and doing it again.
If I’m coating a garage, basement, patio, or shop floor in North Idaho or Eastern Washington, this check helps me spot trouble before install day and avoid peeling, bubbling, or bond failure later.
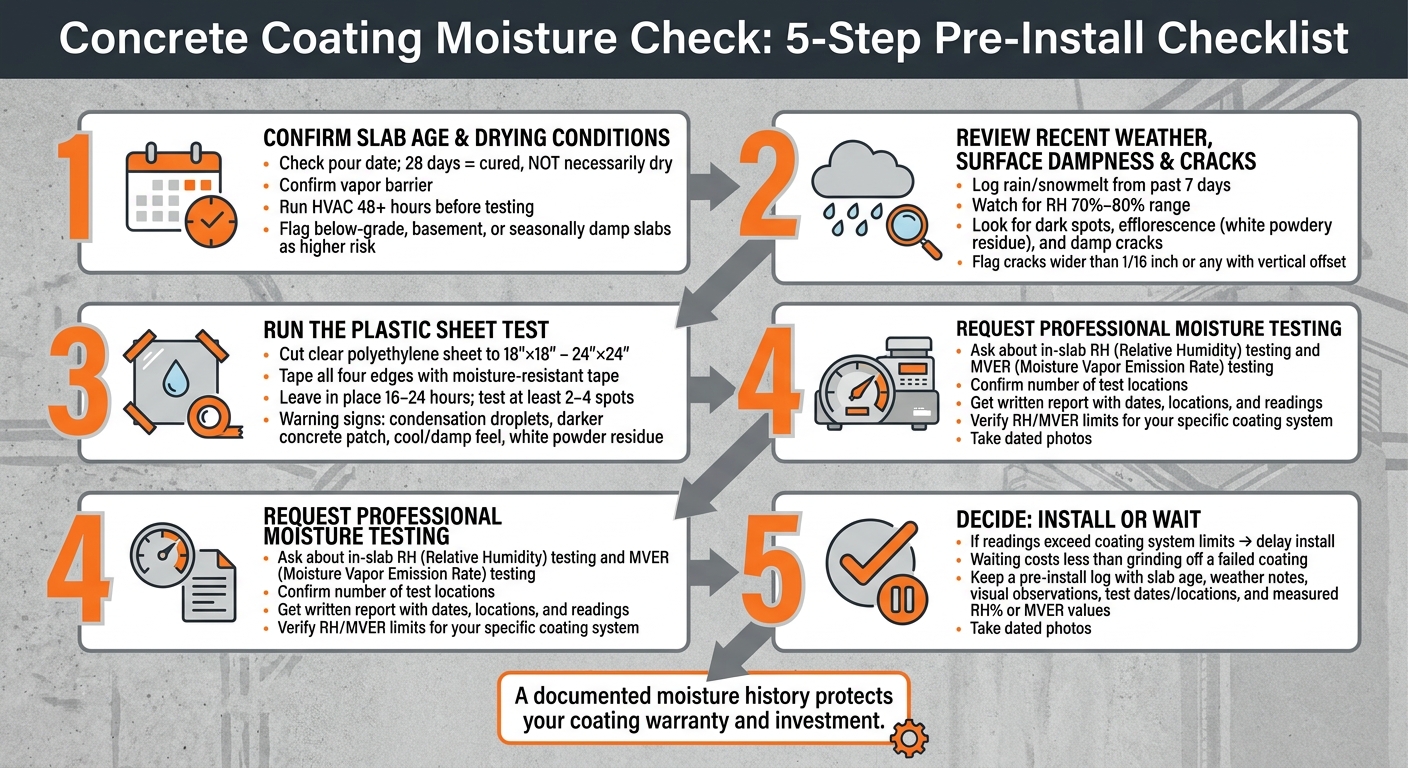
Concrete Coating Moisture Check: 5-Step Pre-Install Checklist
The 5-Point Concrete Moisture Test System (Complete Slab Assessment Guide)
sbb-itb-a0e5ae3
Checklist Step 1: Confirm Slab Age and Drying Conditions
Check the slab’s age and drying conditions before you run any moisture test or lock in an install date. RH and MVER numbers can look fine on paper, but they don’t mean much if you haven’t first checked how old the slab is and what it’s been exposed to.
Record the Pour Date and Curing Time
Write down the pour date, planned install date, and the dates of any repairs or patches. And don’t assume 28 days = fully dry. Concrete may cure in that window, but drying depends on the mix, slab thickness, temperature, humidity, and curing conditions.
If you don’t know the exact pour date, use the best record available from the project file.
Check for a Vapor Barrier and Stable Indoor Conditions
For on-grade slabs – poured right on the ground – confirm whether there’s an under-slab vapor barrier. If the barrier is missing, damaged, or simply unknown, the chance of moisture trouble goes up.
Also, keep the HVAC running and indoor conditions steady for at least 48 hours before testing or setting the install schedule. That matters because stable conditions help RH and MVER readings reflect what’s happening in the slab, not short-term swings in the room.
Flag Higher-Risk Slabs
Some slabs deserve extra caution from the start. That includes:
- Below-grade slabs
- Basement floors
- Older slabs with little or no construction history
- Spaces that get damp during certain seasons
These conditions carry more moisture risk. And here’s the tricky part: a slab can look dry while still holding moisture below the surface.
| Condition | Lower Risk | Higher Risk |
|---|---|---|
| Slab age | Older slab with documented curing history | New slab under 28 days or unknown age |
| Vapor barrier | Confirmed barrier installed | No barrier, damaged, or unknown |
| Slab location | On-grade with stable indoor conditions | Below-grade, basement, or seasonally damp |
| Indoor environment | HVAC running, stable for 48+ hours | Temperature or humidity still fluctuating |
Flag these slabs for professional RH or MVER testing.
Once you’ve checked slab age and drying conditions, move to recent weather, surface dampness, and crack checks.
Checklist Step 2: Review Recent Rain, Surface Dampness, and Cracks
Next, inspect the concrete and check recent weather before any professional testing. Start with what happened over the past week. Then look at what the concrete is telling you right now.
Log Recent Rain, Snow Melt, and Forecast Conditions
Write down any heavy rain or snowmelt from the past 7 days, including the date, how long it lasted, and how hard it came down. Then walk the perimeter and look for standing water or soaked soil near slab edges, walls, and low spots.
After that, check a local weather app or weather site for the next 3–7 days. Back-to-back rain or snow, or relative humidity in the 70%–80% range, is a sign to slow down the install and do more testing.
Look for Dark Spots, Damp Areas, and Efflorescence
Walk the slab slowly in good light. Look for spots that seem darker or a little wet compared with the rest of the concrete. If a dark patch sticks around, it can be an early sign that moisture is moving up through the slab.
Pay close attention to:
- Walls and baseboards
- Garage doors and exterior thresholds
- Floor drains and plumbing penetrations
- Low corners where water tends to collect
White, chalky, or powdery residue is efflorescence. That means moisture is moving through the concrete. If it comes back after cleaning, that points to a steady moisture source, not a one-time issue. Take photos, note the size and location, and flag each area for your installer.
Check Cracks, Joints, and Patched Areas
Inspect every crack, control joint, and patched spot when the slab is dry. Then check again after rain or high humidity. Look for dark or damp lines along cracks, mineral buildup inside joints, or tiny beads of moisture after rain or snowmelt. If a crack looks dry in fair weather but gets darker or damp after precipitation, moisture may be moving through that path.
Hairline shrinkage cracks are often narrow and stable. Wider or active cracks need more attention, especially anything over 1/16 inch or any crack with vertical offset or movement. Coating over an active crack can lead to reflective cracking, joint failure, or bond failure. Mark those areas with tape or chalk, measure the width, and add them to your notes.
If you keep seeing dampness, efflorescence, or active cracks, move to moisture testing before install. Following a concrete moisture testing guide ensures you use the right methods for your specific slab.
Checklist Step 3: Run Basic Moisture Checks and Ask About Professional Testing
Once you’ve logged weather conditions and marked any cracks or damp spots, do a quick hands-on check. Then confirm what professional testing your installer plans to use.
Use a Plastic Sheet Test for a Quick Surface Check
If weather, damp spots, or cracks gave you pause, do a quick surface check next. This is a simple screening test you can handle yourself.
Start by cleaning the concrete so it’s free of dust, oils, and coatings. Then cut a clear polyethylene sheet to about 18 in. x 18 in. to 24 in. x 24 in. Tape down all four edges with moisture-resistant tape, and make sure there are no gaps. Leave it in place for 16–24 hours.
When you remove it, check for:
- Condensation droplets on the underside
- A darker patch of concrete underneath
- Concrete that feels cool and damp
- A faint white powder after drying
Any of those signs can point to a moisture issue.
Test at least 2–4 spots in a typical two-car garage or small retail space. Pay close attention to areas near exterior doors, cracks, and any zones you flagged in Step 2.
A dry result does not mean the slab is cleared. This is only a screening check. If you see condensation or darkening, treat that as a signal to move to professional testing.
Ask Which Professional Moisture Tests Will Be Used
If the plastic sheet test shows any warning sign, move to formal testing. Ask your installer which standardized tests they plan to use. You want to know if they’ll use in-slab RH testing, calcium chloride testing, or both, and what limits apply to your coating system.
Before install day, confirm:
- Which tests will be used, and how many locations?
- What RH and/or MVER limits apply to your specific coating system?
- Ask for a written report with dates, locations, and readings.
When to Call Croc Coatings

If the slab history is unclear or any test raises concern, stop there and get a professional review. For homeowners and small business owners in North Idaho and Eastern Washington, Croc Coatings can handle a pre-install site review and moisture check before the coating goes down.
Conclusion: Use Moisture Checks to Protect Your Coating Investment
After the checklist and test results, use what you found to decide if the slab is ready for coating. Check the basics: slab age, recent weather, visible dampness, cracks, and test results.
Waiting to install is cheaper than fixing a failed floor. Taking these steps helps you avoid common concrete coating mistakes that lead to early delamination. If RH or MVER readings are above the coating system limits, hold off until the slab dries or moisture mitigation is in place.
Keep a Simple Pre-Install Record
Keep a short pre-install log. At minimum, include these five items:
- Slab pour date or approximate age
- Recent weather notes such as heavy rain, snow melt, or long periods of humidity
- Visual observations like dark spots, efflorescence, or damp cracks
- Test dates and locations showing which areas were tested and when
- Measured results with the RH percentage or MVER value for each location
Add a few dated photos from your phone, and you’ll have a clear record of slab conditions before installation. Share that record with your installer before install day so they can check whether conditions meet product and warranty requirements, or if more drying time or moisture mitigation is needed.
This kind of record gives you something concrete to look back on later. If questions come up about how the floor performed, a documented moisture history can show that the coating was installed under the right conditions and can help during warranty discussions.
FAQs
How do I know if my slab is dry enough to coat?
A quick look at the slab won’t tell you enough. Moisture can stay trapped below the surface, and that’s when problems start: peeling, bubbling, and delamination.
The most dependable way to test is in-situ relative humidity (RH) under ASTM F2170. This test is taken at 40% of the slab depth, and the target is 75% RH or lower.
You can also use the calcium chloride test under ASTM F1869. For that method, a common standard is an MVER of 3 to 5 lbs per 1,000 sq. ft. per 24 hours.
What moisture test should I ask for before installation?
The most reliable test is the in-situ relative humidity (RH) probe test (ASTM F2170). It checks moisture inside the slab by drilling to 40% of the slab depth, which gives the most accurate data for coating performance.
For a more complete moisture profile, pros may also use the Calcium Chloride test (ASTM F1869) to measure surface moisture vapor, along with electronic moisture meters (ASTM F2659) for fast initial mapping.
Can recent rain or humidity delay my coating project?
Yes. Recent rain and high humidity can slow down your coating project because concrete pulls in moisture from both rain and damp air.
If too much moisture gets trapped in the slab, the coating may not bond the way it should. That can lead to peeling, blistering, or bubbles later on.
To deal with that, Croc Coatings may give the surface more time to dry, use dehumidifiers, or apply moisture-mitigating primers before installation.