Most concrete coating failures start below the surface, not on top of it. If I had to sum up the issue in one line, it would be this: test the slab, stop the water, then coat it.
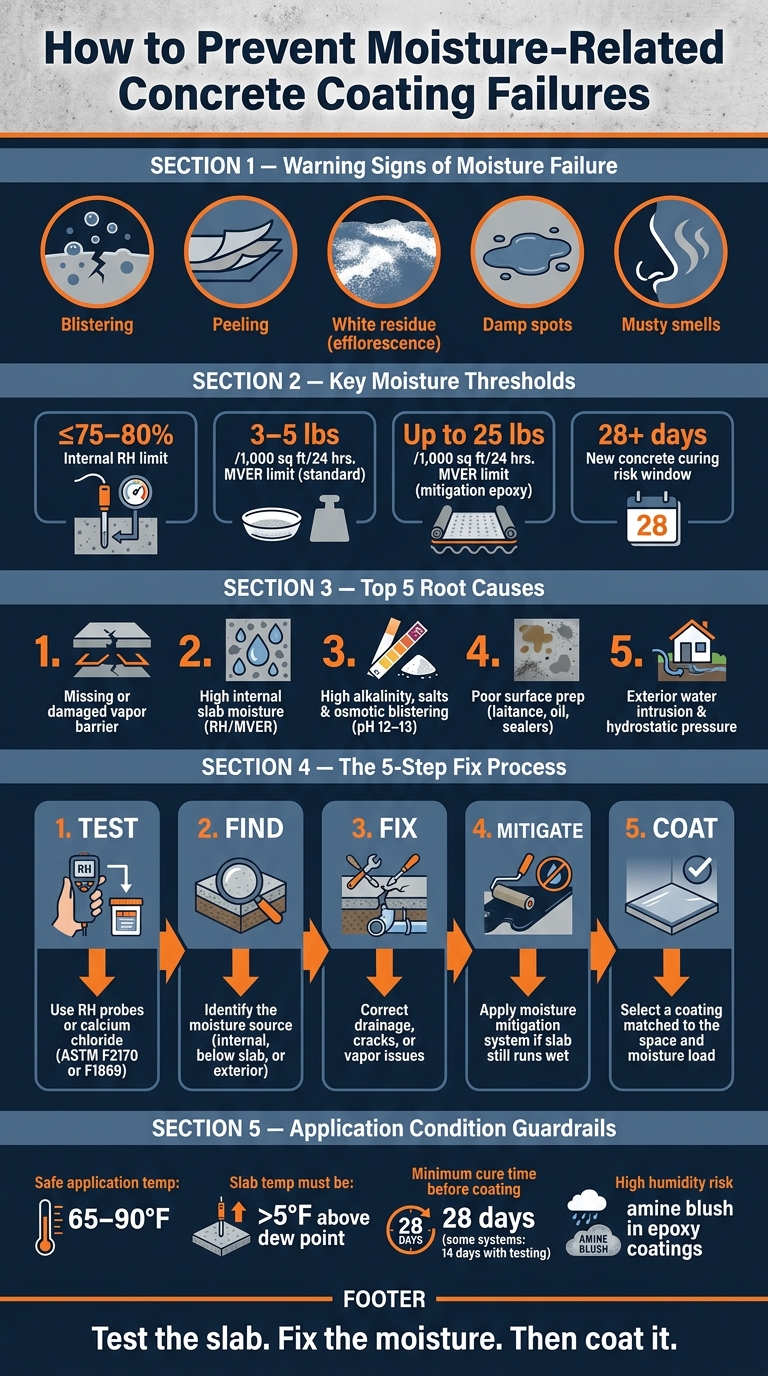
A floor can look dry and still fail 3 to 6 months later. That usually happens when moisture vapor moves up through the concrete, gets trapped under a non-breathable coating, and starts to break the bond. In many cases, the warning signs are clear: blistering, peeling, white residue, damp spots, and musty smells.
Here’s the short version of how moisture affects concrete coating performance:
- Slab moisture: high internal RH, high MVER, or no working vapor barrier
- Chemical pressure: high pH, salts, and osmotic blistering at the bond line
- Bad prep: laitance, oil, grease, sealers, or curing compounds left on the slab
- Bad timing: coating too soon, cold slabs, hot slabs, high humidity, or dew-point issues
- Outside water: poor grading, groundwater, seepage, and hydrostatic pressure
A few numbers matter right away:
- Many moisture-sensitive coatings want about ≤75% to 80% internal RH
- Common MVER limits are about 3 to 5 lbs/1,000 sq. ft./24 hrs
- New concrete may still be too wet even after 28 days
- Some mitigation epoxies are rated much higher, up to about 25 lbs/1,000 sq. ft./24 hrs
The fix is usually simple in order, even if the job itself is not:
- Test the slab with RH probes or calcium chloride
- Find where the water is coming from
- Fix drainage, cracks, or vapor issues first
- Use a mitigation system if the slab still runs wet
- Choose a coating that fits the space and moisture load
If I were reading this before coating a garage, basement, patio, pool deck, or shop floor in North Idaho or Eastern Washington, that’s what I’d want to know first.
How to Prevent Moisture-Related Concrete Coating Failures
Avoid Flooring Failures by Understanding Concrete Moisture
sbb-itb-a0e5ae3
Root Causes Inside and Below the Slab
The worst floor coating failures usually begin under the slab, where moisture is tough to spot and even tougher to control.
Missing Vapor Barriers and Moisture Vapor Transmission
Concrete is porous. That means water vapor can move through it.
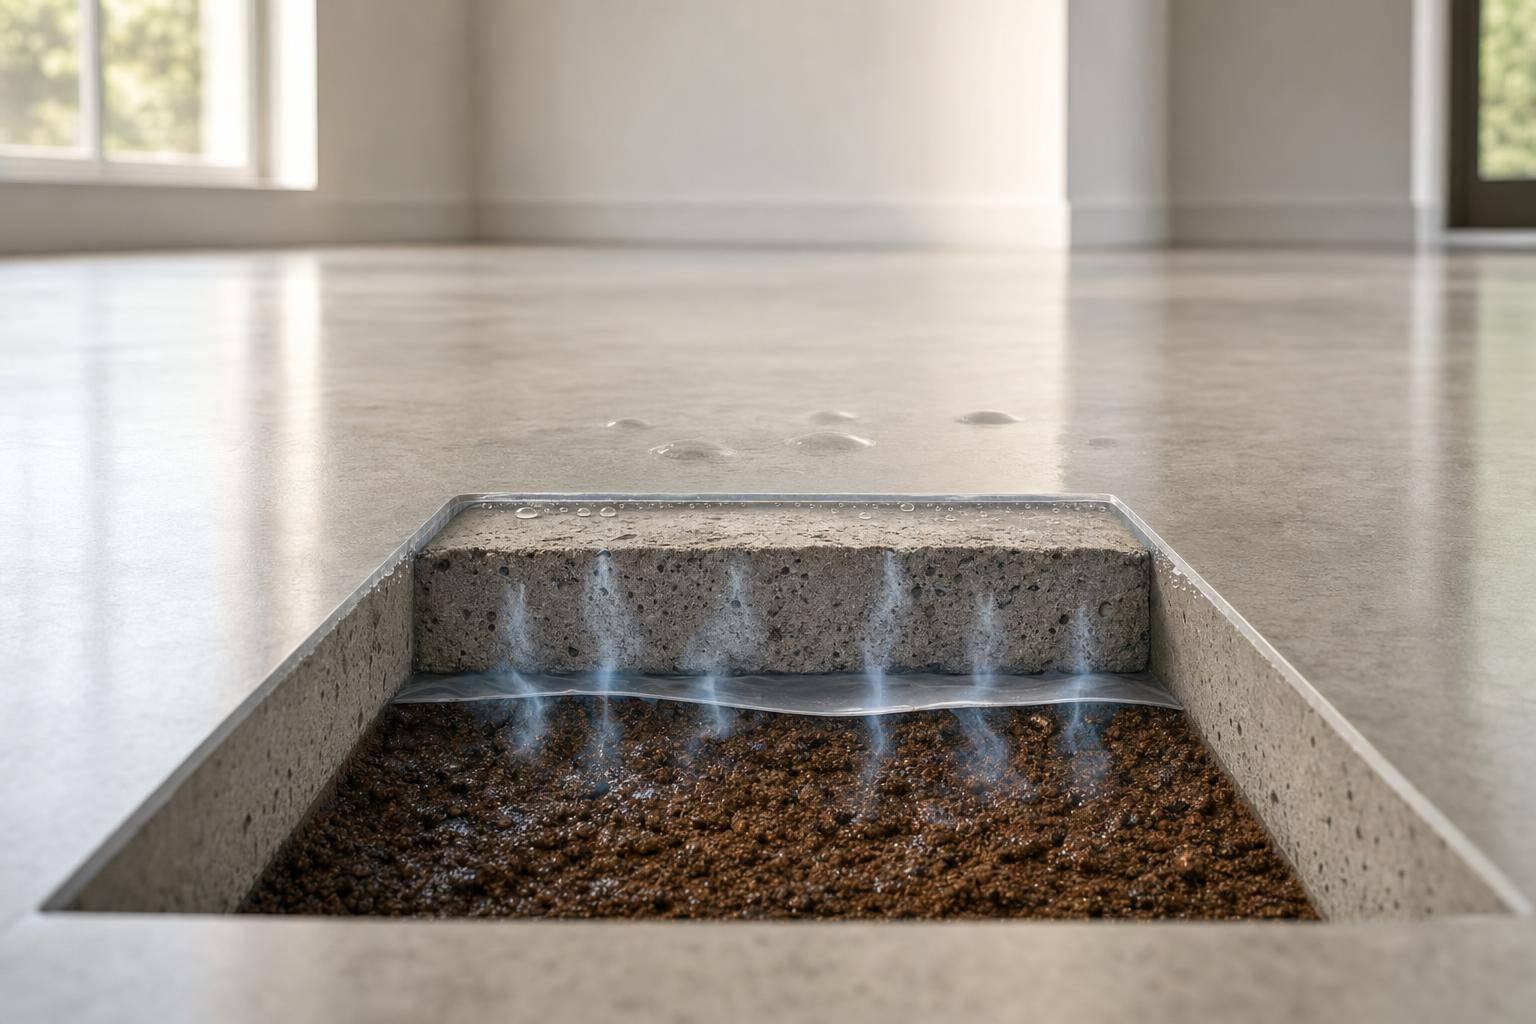
If a slab was poured without an effective vapor barrier – or the barrier was torn, misplaced, or installed badly – moisture from damp soil or a high water table can travel up into the concrete and keep moving toward the surface. Once a non-breathable coating is applied, that moisture gets stuck at the bond line. That’s when you start seeing bubbling, blistering, and delamination.
This is a common issue with older slabs in North Idaho and Eastern Washington. Many of them were built without a modern vapor barrier, so the risk is already there before any coating work begins.
And even when a vapor barrier exists, that doesn’t always solve the whole problem.
High Internal Moisture and Relative Humidity in Concrete
A slab can look dry on top and still hold a lot of moisture deep inside. The surface dries first, so the floor may seem ready even though the concrete below still tests wet.
For moisture-sensitive coatings, common target ranges are about ≤75–80% internal relative humidity (RH) and 3–5 lbs/1,000 sq ft/24 hrs for moisture vapor emission rate (MVER). In cooler, wetter areas like the Inland Northwest, slabs often come in above those levels – especially in unheated garages and basements with poor airflow.
New concrete isn’t automatically dry, either. Even after 28 days of curing, internal RH can still remain above 80%, and it may take several months to fall into a safer range. So if someone coats the slab based on how it looks instead of how it tests, the problem may not show up until later, usually as blistering or bond failure.
Moisture doesn’t travel alone, either. It can bring other trouble with it.
High Alkalinity, Soluble Salts, and Osmotic Blistering
Fresh concrete is highly alkaline. Its pore water often reaches a pH of 12–13. On top of that, soluble salts like chlorides, sulfates, and carbonates may already be in the concrete or can be added later through deicing chemicals, soil contact, or water intrusion.
As moisture moves through the slab, it carries those compounds right to the bond line. Over time, that area becomes more alkaline and more contaminated, which weakens adhesion and can lead to osmotic blistering.
On impermeable resin floors, those blisters can appear within 3–6 months of installation, even if the floor looked fine at first. And if moisture and salts keep feeding that same bond line, the blisters tend to come back. That’s a big issue on exterior slabs in the Inland Northwest, where snowmelt and deicing salts keep the cycle going.
Application and Site Conditions That Worsen Failures
Even a slab that’s only borderline can fail when prep is poor, cure time gets rushed, or site water isn’t under control. So after you check the slab itself, the next places to look are surface prep, cure timing, and how poor drainage leads to failures.
Poor Surface Preparation and Hidden Contaminants
Concrete can look fine on the surface and still hide trouble underneath. One common issue is laitance – a soft, dusty layer that forms at the top during placement. It may look solid, but it doesn’t bond well. If a coating goes on top of it, the coating sticks to that weak layer instead of sound concrete. Then moisture pressure can trigger small areas of peeling.
Oil and grease cause a different kind of mess. Residue from vehicles or machinery can repel many coatings, leaving round bare spots or "fisheyes" that stand out after installation. Old sealers and chemical curing compounds are another frequent problem. Many slabs get these products right after they’re poured, and if they aren’t fully removed before coating, they act like bond breakers.
Here’s the catch: acid etching usually won’t remove those materials. In most cases, you need mechanical grinding or shot-blasting instead. If those contaminants stay in place, they block adhesion and give moisture room to lift the coating.
A simple water-bead test can help. If water beads on the slab, there’s still residue on the surface and more prep is needed.
Once the slab is clean, timing becomes the next place things go sideways.
Coating Too Soon or in the Wrong Conditions
Cure time matters a lot more than many people think. Standard industry practice calls for at least 28 days of curing before most coatings go over new concrete. Some systems can go on after about 14 days, but only if moisture testing backs that up. A quick look at the slab isn’t enough.
Jobsite conditions during installation matter just as much. One guideline puts the application range at 65–90 °F. Below 65 °F, the coating may not cure all the way. Above 90 °F, or when the slab sits in direct sun, outgassing and fast evaporation can trap bubbles in the coating.
Humidity can also cause trouble. High humidity may lead to amine blush in epoxy and other amine-cured coatings, leaving behind a weak, whitish film. And if the slab temperature is within 5 °F of the dew point during application, condensation can form on the surface and weaken the bond.
If all of that checks out, the next step is to ask a plain question: is water still getting in from outside?
Drainage Problems, Water Intrusion, and Hydrostatic Pressure
Some slab moisture issues don’t start inside the building at all.
Poor grading that slopes toward the foundation, gutters that dump water too close to the structure, and hillside lots where groundwater collects against the downhill foundation wall can all keep the area under a slab damp for long stretches. Over time, that steady moisture drives vapor upward. In worse cases, it can even force liquid water through microcracks and cold joints.
Basements are especially vulnerable. Hydrostatic pressure from groundwater outside the foundation can be strong enough to damage the concrete itself, never mind the coating on top of it. Damp spots, efflorescence, and seepage where the wall meets the floor are all signs that water is moving through the assembly.
When water keeps feeding the slab, recoating is just a cover-up. The fix usually starts outside or below the surface, with grading changes, perimeter drains, sump pumps, or crack injection before any recoating happens.
How to Prevent Moisture-Related Coating Failures
Once you know where the moisture is coming from, the fix usually follows a simple order: test first, stop the source, then pick the best industrial floor coating. That order matters. The failure causes already covered – vapor transmission, trapped moisture, and outside water – don’t all need the same fix. And when that sequence gets skipped, a floor that looked fine on day one can start failing a few months later.
Moisture Testing Before Any Coating Is Installed
Don’t judge a slab by how it looks. A dry-looking surface can still hold enough moisture to cause trouble after the coating goes down. The safer move is to use the right test for the slab and compare the result with the coating maker’s stated limits.
| Test Method | What It Measures | Units | Test Duration | Best Used When |
|---|---|---|---|---|
| ASTM F2170 In-Situ RH Probe | Internal slab relative humidity | % RH | At least 24 hrs after probe installation | Predicting long-term coating performance; primary method for slab-on-grade |
| ASTM F1869 Calcium Chloride (MVER) | Moisture vapor emission from the slab | lb/1,000 ft²/24 hr | 60–72 hrs | Documenting surface emission rates; comparing sections of a floor |
| Non-Destructive Moisture Meter | Surface moisture indicator | Relative scale | Minutes | Fast screening to identify suspect areas before formal testing |
For slab-on-grade floors, use in-situ RH probes at the manufacturer’s standard depth and let them equilibrate before taking a reading. Then compare the results with the coating manufacturer’s published limits. Many systems use a pass/fail cutoff of 3–5 lb/1,000 ft²/24 hr MVER or a maximum internal RH in a similar range. If the slab is over that limit, you’re not ready for the finish coating yet. A mitigation step has to come first.
If the readings come back high, that doesn’t mean the test failed. It means the test did exactly what it was supposed to do. Now you know there’s a moisture issue, and the next move is source control or mitigation.
Fixing the Moisture Source and Using Mitigation Systems
Testing helps answer a simple question: is the moisture coming from inside the slab, below it, or from outside? Once you know that, the repair path gets much clearer.
Start with exterior water. If water is actively getting into the slab from outside, no coating system is going to outrun that. Drainage correction comes first when exterior water is feeding the slab. Crack and joint repair can stop water at specific entry points, but that won’t solve slab-wide vapor emission or how hydrostatic pressure affects concrete floors by itself.
Sometimes the source can’t be fully removed. That’s common with older slabs that don’t have vapor barriers, basements that stay damp during part of the year, or slabs with high RH but no active leak. In those cases, a surface-applied moisture mitigation system can help create a stable base for the finish coating. Some 100%-solids epoxy moisture vapor barriers are rated for up to about 25 lb/1,000 ft²/24 hr of vapor emission. That’s a big jump from the limits many finish systems allow.
Still, these systems aren’t magic. They work best as part of a broader plan, not as a patch over a slab with active water intrusion.
| Mitigation Approach | Problem It Addresses | Main Strength | Practical Limitation |
|---|---|---|---|
| Drainage correction | Exterior water feeding the slab | Most durable long-term fix | May be limited by site constraints or construction access |
| Vapor control / moisture barrier | Moisture vapor moving through the slab | Reduces transmission at the slab surface | Requires compatible finish coating and realistic pre/post moisture readings |
| Crack and joint repair | Localized water entry points | Stops specific pathways | Won’t resolve slab-wide vapor emission or hydrostatic pressure |
| Surface-applied mitigation system | High MVER or elevated RH with no active leaks | Creates a coating-ready surface when source can’t be eliminated | Depends on proper installation and compatible topcoat chemistry |
After the slab is under control, the last step is choosing a coating system that fits the space and the kind of exposure it will face.
Choosing a Coating System That Fits Local Conditions
The coating has to match both the slab and the setting. A garage floor, a basement, a pool deck, and a small commercial floor may all be concrete, but they don’t live the same life. A system that works well in one spot can fall apart in another.
Garages and commercial floors need abrasion resistance and chemical resistance, but they also need moisture tolerance. Basements call for strong adhesion in cooler, damper spaces with less airflow. Patios and pool decks deal with UV exposure, thermal movement, and standing water, which knocks out a lot of interior-grade systems.
This gets even more important in colder, wetter Inland Northwest conditions. In North Idaho and Eastern Washington, system selection should be based on how the slab behaves under moisture, not how the surface looks on a walk-through. Croc Coatings matches the system to the slab conditions after testing and moisture control are complete.
Conclusion: Match the Cause to the Right Fix
Once you know how moisture is getting into the slab, the next move is simple: match the problem to the right repair.
Concrete coating failures tend to follow the same patterns. In most cases, they come from a small group of repeat causes. If you fix one issue but leave the others in place, the coating often fails again.
The order matters. First, identify the moisture mechanism. Then inspect the concrete for moisture and contaminants. After that, choose the coating system that fits the conditions. A visual check isn’t enough to spot trapped moisture, which is why the cause matters more than the coating by itself.
Local weather can keep slabs wet longer than people expect. In this region, coating success starts with moisture control, not with how the surface looks.
The coating comes last, not first. Test the slab, fix the moisture source, then coat it.
FAQs
How can a concrete floor look dry but still fail later?
A concrete floor can seem dry at first glance and still hold enough moisture inside the slab to cause trouble later. Concrete is porous, so moisture can travel up through it from groundwater, leftover mix water, or even humidity in the air.
That becomes a problem when you apply an impermeable coating. The vapor has nowhere to go, so it gets trapped at the bond line. Then, as pressure or temperature climbs, that bond can start to fail. The result is often blistering, peeling, or delamination.
Which moisture test should I use before coating concrete?
The in-situ Relative Humidity (RH) test (ASTM F2170) is widely considered the gold standard because it measures moisture inside the slab and gives a more reliable read on the slab’s condition.
For a fuller assessment, pros may also use the Calcium Chloride test (ASTM F1869) to check surface vapor emission. Electronic moisture meters and the plastic sheet test (ASTM D4263) can also help flag spots that need a closer look.
When do I need a moisture mitigation system?
You need a moisture mitigation system when concrete moisture levels go past industry limits. If MVER or internal RH is too high, it can lead to blistering, peeling, or delamination.
Mitigation is usually needed when MVER is above 3 to 5 lbs per 1,000 square feet in 24 hours or internal RH is above 75% to 85%. Professional testing helps confirm the risk and protect the durability and warranty of your Croc Coatings installation.