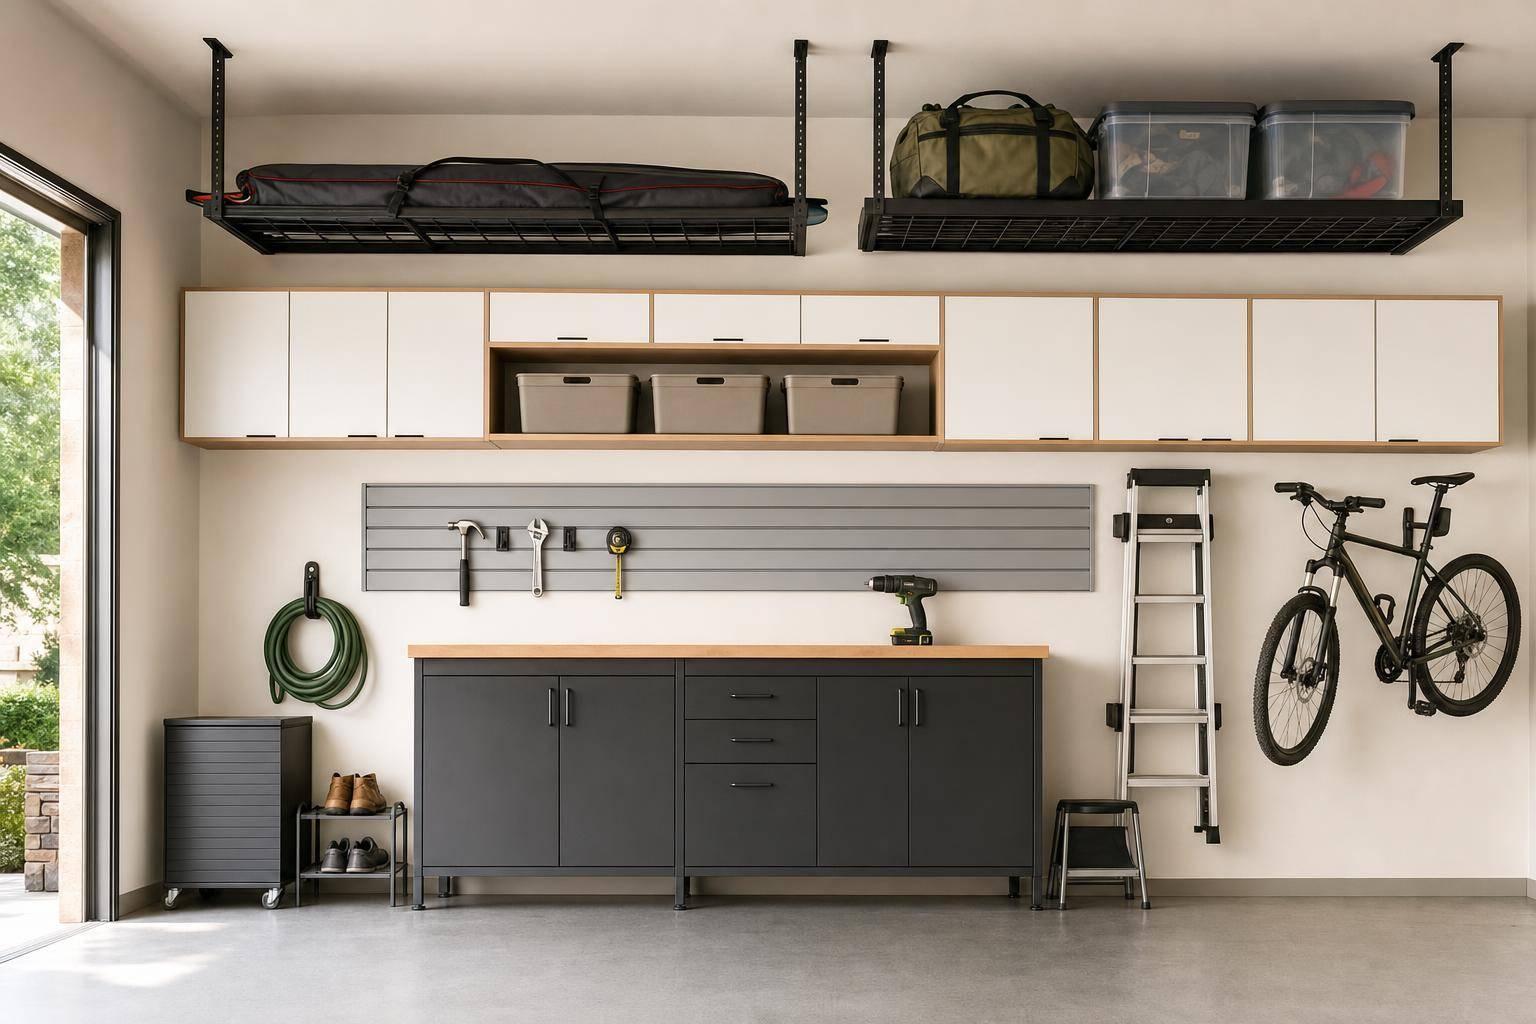
Most garage mess starts with no storage plan, not too little storage. If I want a garage that fits the car, keeps tools easy to find, and stays easy to clean, I need to sort everything into four zones: floor, primary wall, upper wall, and ceiling.
Here’s the short version:
- Floor zone: keep it open for parking, walkways, and wheeled gear
- Primary wall zone (2–6 ft): store daily and weekly items
- Upper wall zone (6–8 ft): use it for labeled seasonal bins
- Ceiling zone (8 ft+): hold rarely used, light, bulky items
- Plan around car doors, walking paths, and garage door clearance
- Use custom or big-box cabinets for dust control, slatwall or pegboard for grab-and-go tools, and overhead racks for holiday or camping gear
- In snowy, muddy areas, a coated floor helps with cleanup and wear
A Consumer Reports poll found that 62% of U.S. garage owners said their garages felt crowded, messy, or disorganized. That’s why this guide focuses on one simple idea: put each item where it fits how you use the garage. You can even use a garage space planner to map out your layout before you start.
Quick comparison:
| Zone | Best for | What I’d store there |
|---|---|---|
| Floor | Open movement | Cars, shop vac, air compressor, mower |
| Primary wall | Easy reach | Hand tools, cleaning supplies, sports gear |
| Upper wall | Less-used storage | Seasonal bins, backup supplies |
| Ceiling | Rare-use bulky items | Holiday décor, tents, pool toys |
I’d sum it up like this: store daily items low and close, move seasonal items high, and keep the floor as clear as possible.
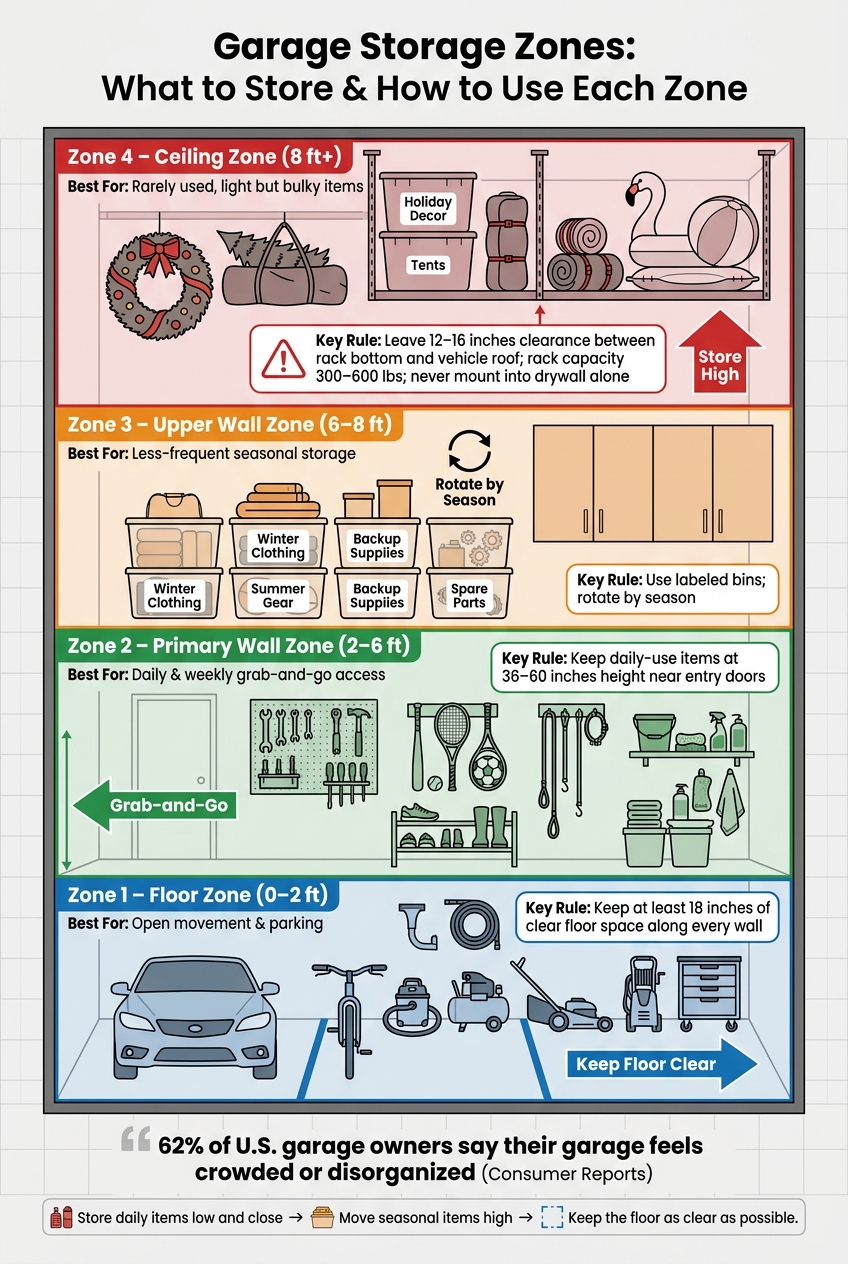
Garage Storage Zones: What to Store Where
How to Organize a Garage | A Step-by-Step Guide
sbb-itb-a0e5ae3
1. Start by Dividing Your Garage into Storage Zones
Start with zones. If you sort by item type alone, the stuff you use every day often ends up buried behind things you barely touch. A zone plan works better because it matches storage to how you move through the garage.
Use the same four zones from the overview: keep the parking zone open, set aside the entry area for daily grab-and-go items, use the side walls for weekly-use gear, and push seasonal items overhead. That simple map shows where cabinets, slatwall, and overhead racks should go.
1.1 Sketch a Zone Map Around Parking and Traffic Flow
Before you buy cabinets or racks, sketch the garage to scale with real measurements. Many two-car garages in the U.S. are around 20–24 ft wide and 20–24 ft deep, but the storage space you can use comes down to what you park inside.
Mark the vehicle footprint first. Then leave 2–3 ft at the front and rear and 30–36 in. on each side for door swing. This is where a lot of layouts go sideways. Deep base cabinets placed too close to the car can make door opening a pain, or worse, lead to dings on the cabinet face. After you mark those clearances, the leftover wall area is the space where storage should live.
Next, draw the main walking paths: from the garage door to the house entry, from the house entry to the yard door, and any route you take often while the car is parked. Aim for at least 3 ft (36 in.) of clear walkway width so the path stays easy to use for both people and rolling gear. One smart trick many garage designers use is painter’s tape on the floor. Mark tire paths, door-swing arcs, and walkway edges before you drill a single hole. It sounds simple, but it can save you from a bad layout. Once those paths are marked, it’s much easier to see where storage won’t get in the way.
Also note where wet or dirty gear comes into the garage, whether that’s from the driveway after rain or from the yard after mowing. In places like North Idaho and Eastern Washington, snow, mud, and road salt show up all the time, so this dirty drop zone near the exterior door needs some thought. Wall hooks for wet coats, a boot tray on the floor, and a surface you can clean without much fuss all make a difference. That last part matters more than people think, which is why a polyurea coated floor should be part of the zone plan from the start.
1.2 Place Items Based on How Often You Use Them
Once the layout is set, place items by how often you use them. A simple rule works well here: if you use it daily, keep it in the easiest reach zone, about 36–60 in. from the floor, near an entry door. Weekly-use items can sit a bit higher or deeper along a side wall. Seasonal items can go overhead or farther back.
| Frequency | Where It Goes | Typical Examples |
|---|---|---|
| Daily | Transition zone, 36–60 in. height, near house door | Shoes, cleaning supplies, hand tools, pet leashes |
| Weekly | Side walls, base or upper cabinets | Lawn mower, sports gear, car wash supplies |
| Seasonal or rarely used | Ceiling racks, high shelves above 72 in. | Holiday décor, camping gear, bulk paper goods |
This approach keeps everyday items close by and pushes seasonal storage out of the way.
2. Pick the Right Wall Storage: Cabinets, Slatwall, and Work Areas
Once you’ve mapped your zones, the walls do most of the heavy lifting. Use closed storage for items that need protection, open wall systems for things you grab all the time, and a small work area for jobs you handle right there. In most garages, three setups carry the load: enclosed cabinets, open wall systems like slatwall or pegboard, and a compact work surface.
2.1 Use Base and Wall Cabinets for Enclosed, Dust-Free Storage
Cabinets make sense for anything you want protected, out of sight, or locked up – power tools, drill bits, screws, automotive fluids, cleaning chemicals, paint supplies, and hobby materials. Open shelving gets dusty in a hurry, and in a garage, that dust seems to land on everything.
Base cabinets are a good fit for heavier items because you can load and unload them at a comfortable height instead of lifting overhead. Wall cabinets are better for lighter items you don’t need as often, like spare parts, small fasteners, or seasonal supplies.
When you’re picking cabinets, build quality and ergonomic features matter more than appearance. Look for interlocking joinery to support heavier loads. A powder-coated finish helps protect against scratches, moisture, and the temperature swings that garages often deal with. Full back panels help block dust, pests, and moisture from getting in behind the cabinet. If you have kids at home, or your garage also serves as a workshop, lockable doors help keep chemicals, solvents, and sharp tools out of reach.
Custom cabinets can be sized to fit your wall layout and finished for garage use. Once installed, following a cabinet maintenance schedule will protect your investment from the garage environment.
Once the closed storage is handled, open wall systems are the best place for the items you use most.
2.2 Add Slatwall or Pegboard for Daily-Use Tools and Gear
Open wall systems fix a different issue: speed. They keep tools easy to see and easy to grab, especially the ones you use several times a week. Slatwall is a strong option for heavier items that may need to move around – ladders, bikes, power tool bags – because its continuous horizontal channels spread the weight and let you shift hooks or baskets without drilling more holes. Pegboard is better for lighter hand tools like wrenches, screwdrivers, and pliers, where a visible setup helps you spot what you need fast.
Compare the systems below:
| Storage System | Visibility | Dust Protection | Access Speed | Best Use Category |
|---|---|---|---|---|
| Base Cabinets | Low (Enclosed) | High | Moderate | Heavy tools, chemicals, bulk supplies |
| Wall Cabinets | Low (Enclosed) | High | Moderate | Small parts, hazardous items (lockable) |
| Slatwall | High (Open) | Low | Fast | Rakes, bikes, sports gear, extension cords |
| Pegboard | High (Open) | Low | Fast | Hand tools, wrenches, screwdrivers |
Once the daily-use tools are on the wall, the next move is simple: put each type of gear in the spot where it actually gets used.
2.3 Put Specialty Items Where They Are Actually Used
Store each specialty item in the zone where you use it. Gardening gear – gloves, pruners, hand trowels, seed trays – should go near the door that leads to the yard, so it’s easy to grab on your way outside. A short section of slatwall with a few hooks and a small basket is often enough for this area.
Automotive tools and repair supplies belong closest to the vehicle bay or workbench. A slatwall panel right behind the bench keeps your go-to tools visible, while base cabinets below can hold heavier items like oil, fluids, and spare parts. Put the bench next to the cabinets and wall storage it works with, and keep outlets and task lighting close by so the surface stays useful.
Cleaning supplies are easiest to use when they’re near the door into the house. Paper towels, spray bottles, and floor cleaner are a lot easier to reach there when you’re coming in from outside.
Keep hobby supplies in one dedicated area so the tools, materials, and safety gear stay together.
Items you use only once in a while shouldn’t take up prime wall space. Move seasonal or less-used gear to upper wall or ceiling storage.
3. Use Ceiling and Upper Storage for Seasonal Items
Once cabinets and wall systems take care of everyday gear, the ceiling becomes the spot for the stuff you barely touch. Think of it as storage for light, bulky, once-in-a-while items after your wall space is full.
Use ceiling storage for things like holiday bins, tents, and seasonal sports gear. Keep daily-use tools, cleaning supplies, and heavy items at eye level or lower. Go with sturdy bins that have lids, and label them on more than one side so you can spot what you need without dragging everything down. It also helps to sort bins by season or activity, then place the least-used ones in the hardest-to-reach areas.
3.1 Move Holiday Bins, Camping Gear, and Bulk Items Overhead
After the cars are parked, garage floor space disappears in a hurry. Moving seasonal bins overhead gives that space back for parking, walkways, and rolling gear. It also leaves you with a clearer path and a cleaner concrete slab. And when fewer bins are sitting on the floor, sweeping or running a shop vacuum gets a lot easier.
The best items for overhead storage are light but bulky. They take up space without putting too much strain on the rack. Good examples include:
- Artificial trees
- Sleeping bags
- Inflatable pool toys
- Holiday wreaths
Heavy items should stay low, even if the rack’s posted weight limit looks high enough.
3.2 Check Ceiling Height, Rack Capacity, and Door Clearance Before Installing
When you plan your garage space optimization, protect parking space first. Storage comes second.
Before you buy anything, measure your ceiling height, vehicle height, rack drop, and bin height. Add the drop and bin height together, then subtract that total from the ceiling height. You should leave 12–16 inches between the vehicle roof and the bottom of the loaded rack.
Most overhead racks sold for garages are rated for 300–600 pounds when they are installed the right way into wood framing. Some heavy-duty models go up to 700 lb. Still, don’t load them to the max. Leave at least 20–30% below the posted limit, and spread the weight across more than one joist instead of piling it into a single area. Racks need to be fastened straight into ceiling joists with lag screws or hardware approved by the maker – never into drywall by itself.
The garage door path also needs to stay fully clear. Open and close the door, watch the full path of the panels and opener rail, and make sure the rack stays away from the door opening, tracks, springs, and opener hardware. The opener rail is completely off-limits. Nothing should hang from it or rest against it, because it needs a bit of flex while the door runs and must stay open for service. Check nearby light fixtures too. A rack that crowds them can cut down visibility and, with some bulb types, lead to heat trouble.
With overhead storage set up the right way, the floor stays open for cars and much easier cleanup. You can also use a garage floor coating planner to coordinate your floor protection with your new storage layout.
4. Keep the Floor Open and Easy to Clean
Once you’ve dealt with ceiling storage, the floor is the last area to plan. Think of the floor as a parking and movement zone first, and a storage zone second. Most items that sit on the floor should either have wheels or be too heavy to lift onto a shelf. Everything else is better off on the walls or overhead.
4.1 Save Floor Space for Cars, Walkways, and Rolling Equipment
Before you put anything on the floor, lay out your parking areas and walking paths. You want a clear path from the garage door to the entry into the house, from the car to the workbench, and enough space to open car doors without hitting stored items.
Garage organization guides recommend leaving at least 18 inches of clear floor space along every wall so cabinets and wall-mounted systems stay easy to reach and the floor stays simple to sweep.
At floor level, keep it to rolling gear or heavy tools that don’t make sense in cabinets or on racks. That might include:
- A rolling tool chest near the workbench
- A shop vac in the corner
- A portable air compressor
- A pressure washer
Each one should have a set place along a wall, so it doesn’t drift into a walkway or block a cabinet door.
4.2 How a Coated Garage Floor Supports the Storage Plan
When the floor is set aside for parking and rolling gear, the surface needs to hold up to that job. Bare concrete is porous, so it soaks up oil, road salt, and water. That makes cleanup slower and can make the floor look worn sooner. A sealed coating helps resist stains and makes cleanup easier. These quick-cure coatings allow for rapid transformation without long downtime. It also stands up to rolling equipment and foot traffic without looking beat up too fast.
For homeowners in North Idaho and Eastern Washington, Croc Coatings can coordinate a Penntek Evolution floor coating with custom garage cabinets that improve home value in one project, helping you decide between custom garage cabinets vs DIY shelves, with one-day installation and a lifetime warranty.
4.3 Why a Lifetime Warranty Matters for Long-Term Value
This is where warranty coverage starts to matter. Understanding lifetime warranty limitations is important because a residential warranty has weight because garage floors deal with temperature swings, spills, and daily traffic. It helps protect long-term value by cutting down future repair worries and keeping the space low-maintenance.
5. Putting the Full Garage Storage Plan Together
By now, each zone has a clear job: walls, ceiling, and floor. The last step is to check spacing, access, and storage placement before anything gets installed.
5.1 Final Layout Checklist Before Installation
Use the zone map and storage types from the earlier sections to review the layout one more time before installation. Go through each area of the garage, from the floor and walls to the upper wall and ceiling zones.
- Clearances and paths: Check vehicle fit, door swing, cabinet depth, and make sure you still have at least 30 in. of walkway width.
- Wall storage mix: Make sure enclosed cabinets go where dust control matters, open slatwall or pegboard goes where fast grab-and-go access matters, and the workbench sits in the right spot with outlets nearby.
- Specialty zones: Place gardening gear near the yard door, cleaning supplies near the house entry, and hobby and sports items at eye level. Use labeled bins in each zone so things stay grouped and easy to find.
- Overhead limits: Check joist locations, rack weight ratings, and confirm ceiling racks clear the garage door track and opener hardware. Leave at least 2 in. between stored overhead items and the tallest vehicle.
- Emergency access: Keep the electrical panel, shutoff valves, and fire extinguisher unobstructed.
Installation order matters more than people think. A simple sequence helps you avoid common epoxy floor mistakes: apply one of the top garage floor coating options first while the garage is empty, then install ceiling racks, then mount wall systems and cabinets, and last, set up the workbench and specialty zones.
If your plan includes uneven concrete, moisture, or a tight layout, it may be time to bring in a pro.
5.2 When to Hire a Professional for Cabinets and Floor Coating
Once the layout is locked in, professional help matters most when the slab, cabinets, and floor coating all need to work together. DIY shelving can be fine for a simple setup. But if you’re dealing with a larger garage, several zones, uneven concrete, or moisture issues, things can go sideways fast without proper prep.
Cracked or sloped floors need grinding and repairs before coating starts. If that prep gets skipped, the finish may not hold up the way you want over time.
Cabinet build quality matters too. Professional custom cabinets use dado-joint construction and full back panels that help keep out dust, pests, and moisture.
For more complex garages, professional installation can coordinate custom cabinets and floor coating in one day, backed by a lifetime residential warranty. Croc Coatings handles both together.
See the finished garage layout in the video below.
FAQs
How do I choose the right storage zone for each item?
Start by grouping items based on how often you use them. Keep everyday items at eye level so they’re easy to grab. Put heavy tools close to power outlets, and use overhead racks or high shelves for seasonal stuff that doesn’t need to stay within reach.
Store hazardous supplies in locked cabinets, and hang long-handled tools on wall-mounted systems. A garage space planner can help you balance storage zones with vehicle parking, workspace needs, and clear paths through the space.
What should go in cabinets rather than open wall storage?
Use cabinets for items that need protection from dust, pests, and moisture, or for things you’d rather keep out of sight.
That usually includes valuable tools, hazardous materials, cleaning supplies, lawn equipment, and the everyday clutter that can make a space feel messy fast.
Locking cabinets add an extra layer of safety and security, which makes them a smart pick for chemicals, sharp tools, or anything you don’t want kids or guests getting into. On the other hand, open wall storage works better for gear you grab all the time, since it keeps those items easy to see and reach.
When is it worth hiring a pro for garage cabinets and floor coating?
It’s worth hiring a professional when you want a high-quality, long-term storage setup made for your garage layout. A pro can handle exact measurements, custom-fitting, and secure mounting, which helps with weight distribution and safety.
Professional installation also makes sense when you’re pairing custom cabinetry with advanced floor coatings. That way, the finish stays clean and damage-free, and the materials are built to last.