I’d choose the floor spec by starting with the ESD target, then checking traffic, chemicals, moisture, grounding, install time, and 10-year cost. If the floor misses even one of those checks, it can pass a lab test and still fail on the job.
Here’s the short version:
- Pick the electrical range first. Most EPAs need resistance to ground below 1.0 × 10⁹ ohms and body voltage under 100V.
- Match the floor to the risk. Electronics assembly, cleanrooms, call centers, and ultra-sensitive lines do not need the same floor.
- Don’t judge by resistance alone. I’d pair ohm targets with body-voltage testing under actual use conditions.
- Check wear and chemicals early. Forklifts, pallet jacks, washdowns, solvents, and high-pH cleaners can push a floor out of spec.
- Prep the slab right. Concrete should be at least 28 days old, have the right surface profile, and pass moisture tests like ASTM F1869 or ASTM F2170.
- Grounding is part of the system. Copper strips and proper tie-in to earth ground matter just as much as the coating itself.
- Compare life-cycle cost, not just bid price. A low install number can turn into more recoats, more testing, and more downtime later.
If I were narrowing options, I’d use this quick filter:
| Type | Best Fit | Watch For |
|---|---|---|
| ESD epoxy | Heavy traffic, forklifts, low-maintenance floors | Cure time and future recoats |
| ESD urethane | Impact, temperature swings, chemical exposure | Similar install cost to epoxy |
| ESD vinyl tile | Fast install, lighter traffic | Seams, lower chemical resistance |
| ESD rubber | Foot traffic and light carts | Mid-to-high cost, moderate upkeep |
Bottom line: the right ESD floor is the one that stays in range after daily traffic, cleaning, and wear – not just on install day.
Below, I break down the checks I’d use before talking to a contractor or writing a spec, or you can use our industrial floor durability analyzer for instant recommendations.
Checklist 1: Define Your ESD Performance and Compliance Requirements
Match the Floor to the Work Area and Process Risk
Start with the baseline resistance range from the introduction. Then narrow it based on the space, the work, and the damage a static event could cause.
An SMT assembly line, a cleanroom, a test-and-repair area, and a 9-1-1 call center do not face the same level of risk. The floor spec needs to fit the process, not just the building.
For electrostatic protected areas (EPAs), ANSI/ESD S20.20 is the governing standard. In mission-critical spaces like 9-1-1 call centers and flight towers, standards such as FAA 019f and Motorola R56 often call for a minimum resistance of 1.0 × 10⁶ ohms to help reduce shock risk. In higher-risk areas, you may need a conductive or static dissipative range than you would for general electronics assembly.
Footwear rules matter just as much. If workers must wear ESD shoes or heel straps, vinyl or epoxy coatings can fit the spec. If regular shoes are allowed, be careful with those coatings. They can generate more than 3,000 volts.
Set Target Resistance and Body Voltage Limits
Don’t write the spec around resistance alone.
A floor can pass an ohm test and still build too much static during daily use. That’s why resistance targets should always be paired with a body-voltage limit. The point isn’t just to hit a number on paper. The point is to control charge on the floor in normal conditions. That target should shape both your coating choice and your test plan. You can use an industrial floor coating planner to align these targets with your specific facility needs.
Use this table to line up the application with the right performance targets:
| Application Type | Applicable Standard | Resistance Target | Body Voltage Limit |
|---|---|---|---|
| Electronics Mfg (EPA) | ANSI/ESD S20.20 | < 1.0 × 10⁹ ohms | < 100V |
| Mission-Critical Facilities | Motorola R56 / FAA 019f | 1.0 × 10⁶ to 1.0 × 10⁹ ohms | < 500V |
| Ultra-Sensitive Mfg | Class 0 Protocols | < 1.0 × 10⁹ ohms | < 20V |
For most electronics settings, a resistance range of 1.0 × 10⁵ to 1.0 × 10⁸ ohms is often the sweet spot. It drains charge fast enough while still balancing electrical safety.
Plan Testing and Documentation
Testing needs to happen before installation and after it.
Use ANSI/ESD STM7.1, STM97.1, and STM97.2 for pre-installation qualification and post-installation acceptance. Test at 12% relative humidity so you can see how the floor performs in low-humidity conditions.
Keep records for:
- Pre-installation testing
- Post-installation testing
- Periodic re-testing
Those records help document compliance with ANSI/ESD S20.20 and IEC 61340-5-1. They also give you a clean baseline for comparing coating systems later.
sbb-itb-a0e5ae3
Checklist 2: Review Traffic, Chemicals, Cleaning, and Facility Conditions
Once the electrical target is set, the next step is simple: make sure the coating can hold up to daily traffic, cleaning routines, and the conditions inside the facility.
Assess Wear from Foot Traffic, Carts, Pallet Jacks, and Forklifts
Daily use can wear an ESD floor out of spec if the coating isn’t built for the job. Constant foot traffic and abrasion slowly wear down the conductive fillers at the surface. And the spots that take the biggest beating – like doorways and workstations – usually break down first and need more frequent testing.
Light foot traffic and hand carts will often work with an ESD epoxy or urethane coating. But pallet jacks, forklifts, and automated guided vehicles (AGVs) call for a heavier-duty system rated for those loads.
It also helps to test high-wear zones on a fixed schedule and track the readings over time. A slow rise in resistance is often the first warning sign that surface wear is pushing the floor out of spec. Catching that early can help prevent downstream component failures.
Next, check that chemicals and washdown won’t cut that service life short.
List Chemical Exposure, Washdown Needs, and Temperature Swings
After you’ve mapped traffic loads, list every chemical the floor may touch. Oils, brake fluids, solvents, acids, alkalis, and disinfectants can all slowly reduce the conductive filler concentration at the coating surface. So the system has to resist chemicals while still meeting electrical requirements.
Cleaning products matter just as much. Use ESD-safe cleaners with a neutral pH of 7 to 9. Standard floor wax and high-pH strippers can leave behind insulating layers that stop the floor from doing its job.
If the facility deals with tracked-in moisture, snow melt, or washdown exposure, specify a system with high chemical resistance to corrosive fumes and wet conditions. And if the space goes through major temperature swings, flexible polyurea vs. epoxy comparisons show that polyurea or urethane mortar systems can help resist cracking from thermal stress.
Then it’s time to check slip resistance and day-to-day upkeep before you lock the spec.
Confirm Cleanliness, Slip Resistance, and Maintenance Expectations
A seamless surface is easier to sanitize and releases less particulate, which makes it a key fit for cleanrooms and biotech facilities. Seams and grout lines can trap contaminants and make cleaning harder. A monolithic coating helps avoid that mess.
Slip resistance needs to be spelled out in the spec. In areas with tracked-in moisture, use a satin or textured finish, or a broadcast aggregate, to keep traction without hurting ESD performance.
Last point: make sure the ESD performance is built into the coating system itself, not tied to topical waxes or dressings that wear off. Croc Coatings‘ Penntek Evolution industrial coating system includes a slip-resistant finish and a no-wax surface.
Checklist 3: Compare ESD Coating Types, Installation Time, and Life-Cycle Cost
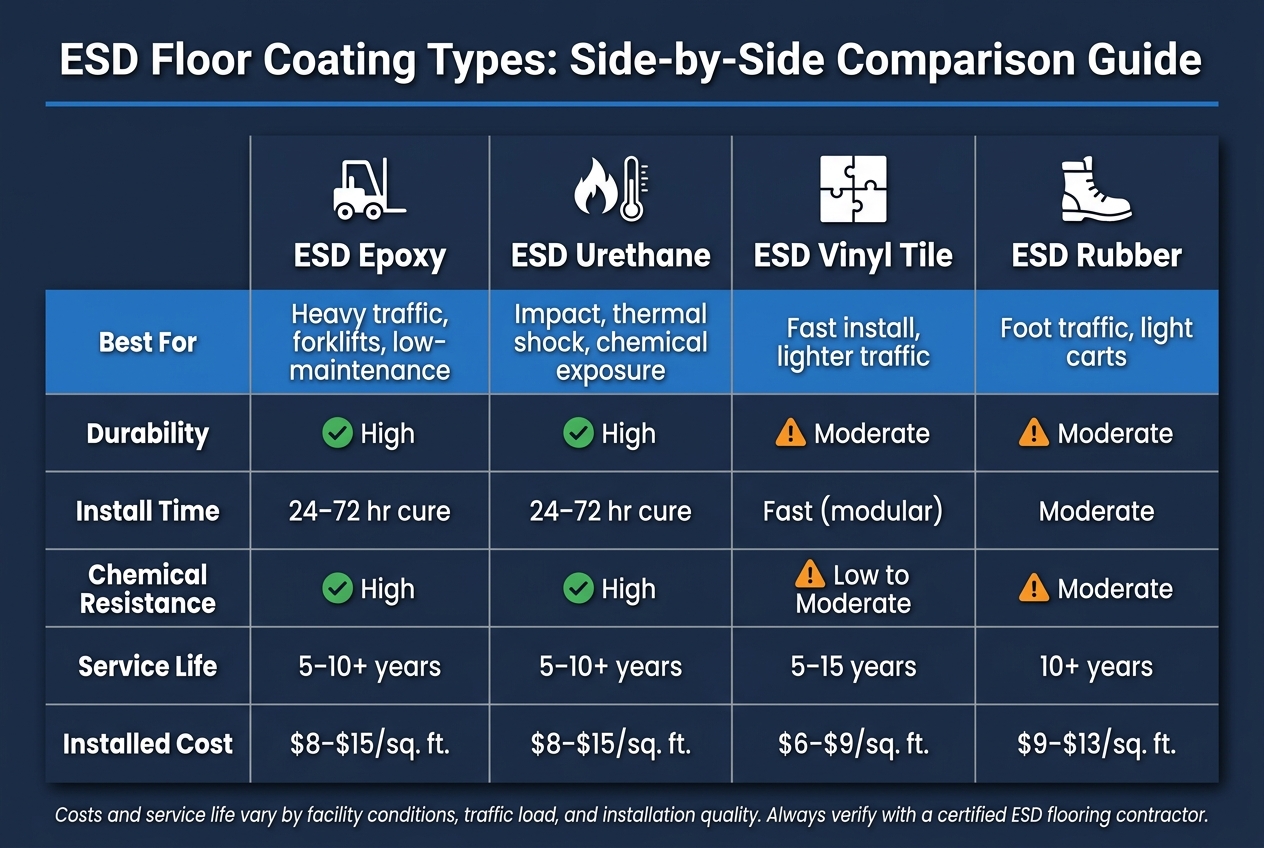
ESD Floor Coating Types: Side-by-Side Comparison Guide
Compare ESD System Types for Concrete Industrial Floors
Now that traffic levels and chemical exposure are clear, the next step is simple: match those conditions to the right floor system. For concrete industrial floors, the main choices are ESD epoxy, ESD urethane, ESD vinyl tile, and ESD rubber. Each one works best in a different setting.
| Flooring Type | Durability | Install Time | Maintenance | Chemical Resistance | Service Life | Installed Cost |
|---|---|---|---|---|---|---|
| ESD Epoxy | High – heavy traffic, forklifts | 24–72 hr cure | Low (seamless) | High | 5–10+ years | $8–$15/sq. ft. |
| ESD Urethane | High – impact, thermal shock | 24–72 hr cure | Low (seamless) | High | 5–10+ years | $8–$15/sq. ft. |
| ESD Vinyl Tile | Moderate – light to medium traffic | Fast (modular) | Moderate (seams) | Low to moderate | 5–15 years | $6–$9/sq. ft. |
| ESD Rubber | Moderate – foot traffic, light carts | Moderate | Moderate | Moderate | 10+ years | $9–$13/sq. ft. |
Use that table as a quick filter. If the floor sees forklifts all day, epoxy or urethane will usually make more sense. If thermal shock is part of the job, urethane often has the edge. If contamination control matters, seamless systems help because there are no seams to trap dirt. And if the shutdown window is tight, modular tile can look attractive.
Once you’ve narrowed the system type, don’t sign off yet. The slab condition, moisture levels, and grounding setup still need to check out.
Check Slab Condition, Moisture, and Grounding Components
Before any coating goes down, the concrete slab has to be ready. Concrete should be fully cured – at least 28 days old – and mechanically prepared to a Concrete Surface Profile (CSP) of 2–3 using diamond grinding or shot blasting. Skip that surface texture, and adhesion can fall apart no matter how good the coating looks on paper.
Moisture is the other big issue. Test to ASTM F1869 for calcium chloride or ASTM F2170 for in-situ RH probes. Most ESD coatings call for moisture vapor emission below 3–5 lbs per 1,000 sq. ft. per 24 hours, or RH below 75%–85%. If test results come in above that range, you’ll likely need a moisture mitigation primer or a specialized urethane system.
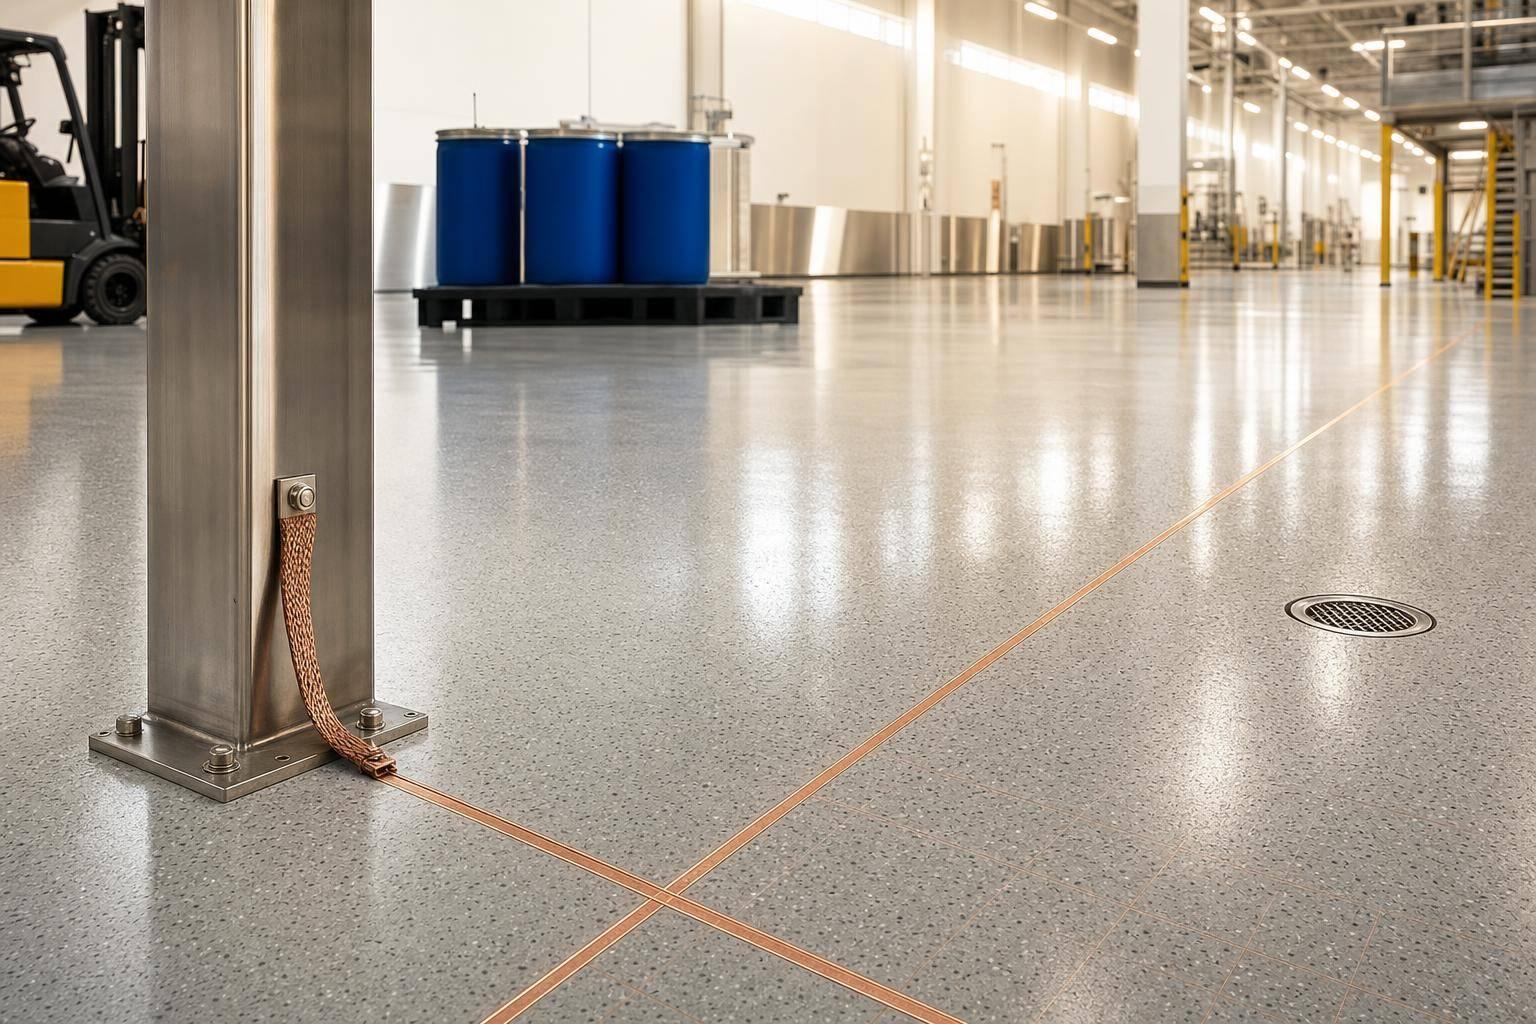
Grounding hardware is easy to miss, and that can turn into a costly mistake. A full system needs copper grounding strips, usually placed every 1,000 sq. ft. or on 20–30 ft. centers, tied into the building’s earth ground by a qualified electrician. Full-coverage conductive adhesive gives the most even path to ground and can keep the floor compliant for 15+ years. Point grounding costs less up front, but noncompliant areas can start showing up in 5–7 years.
Compare Downtime, Maintenance, Warranty, and Total Cost of Ownership
Once the slab is ready, compare installation downtime against upkeep and 10-year cost. That tradeoff matters more than many buyers expect.
Maintenance often ends up driving the actual cost. A standard floor wax can push resistance out of spec in just one application. So the 10-year budget should account for approved cleaners, staff training, and recoat timing.
When you’re looking at bids, don’t stop at the install number. Focus on 10-year ownership cost. High-traffic epoxy floors often need recoating every 3–5 years, and the full number should also include annual or quarterly resistance testing plus specialized cleaning products.
Checklist 4: Build the Final Specification and Confirm Key Selection Points
Coordinate ESD Needs with a Durable Concrete Coating System
Once you’ve picked the system type, the next step is to lock the spec and confirm how the install will happen. A tough floor by itself isn’t enough. The final spec also needs to hit the ESD target and match the grounding plan. That means setting the required resistance range, checking the grounding design, and planning post-install field testing under ANSI/ESD S20.20.
Use the table below to review the spec before any work begins.
Pre-Installation Checklist for Your Contractor and Facility Team
Use this as the final pre-install signoff list.
| Item | What to Confirm |
|---|---|
| ESD performance target | Resistance range and body-voltage limit (< 100V per ANSI/ESD STM97.2) |
| Applicable standards | ANSI/ESD S20.20, ASTM F1869, and ASTM F2170 |
| Slab test results | Concrete cured for at least 28 days, how moisture affects concrete coating performance verified, and CSP 2–3 profile confirmed |
| Traffic and chemical exposure | Load types, chemical contact, and washdown frequency documented |
| Grounding layout | Copper grounding strips placed and verified by a licensed electrician before coating is applied |
| Cleaning plan | pH-neutral (7–9) ESD-safe cleaners specified; conventional waxes and high-pH strippers prohibited |
| Installation schedule | Downtime window and return-to-service date confirmed |
| Post-installation testing | Point-to-point and point-to-ground resistance mapped across the floor before occupancy |
Run acceptance testing with the same footwear workers will actually wear on the floor. That small detail matters. A system can look fine on paper and still miss the mark in day-to-day use if the test setup doesn’t match job conditions.
Conclusion: The Core Points for Choosing an ESD Floor Coating
Treat ESD control and coating life as the same decision. A floor that manages static but breaks down under traffic isn’t doing its job. And a floor that stays intact but drifts out of ESD spec isn’t doing it either.
Check every line in the table above before the project starts. That’s how you make sure the floor protects both the concrete below and the sensitive work happening above it.
FAQs
How do I know which ESD range my facility needs?
Match the floor’s electrical resistance to your equipment sensitivity and safety needs.
Here’s the simple way to think about it: the lower the resistance, the faster static moves away. That matters a lot if you’re working around sensitive electronics or places where a spark could cause trouble.
- Conductive: below 1 x 10^6 ohms. Best for highly sensitive or explosive areas.
- Static-dissipative: 1 x 10^6 to 1 x 10^9 ohms. A good fit for most electronics, data centers, and manufacturing spaces.
- Anti-static: above 1 x 10^9 ohms. Not enough for sensitive electronic areas.
One more thing: don’t judge the floor by the material alone. Test the full flooring system with your facility’s footwear to make sure it performs the way you need it to.
What floor type is best for forklifts and heavy traffic?
Industrial epoxy flooring is the go-to option for areas with forklift traffic. It holds up well under heavy loads and constant wear because it has high compressive strength and strong abrasion resistance.
For the best performance, use a high-build epoxy system with enough thickness, plus a durable urethane topcoat. That extra layer helps the floor stand up to the daily grind.
If the space is wet or deals with extreme temperatures, urethane cement is often the better fit. It handles thermal shock and moisture better than epoxy, which matters in places where conditions can shift fast.
No matter which system you use, add an aggregate broadcast for OSHA-compliant slip resistance in active forklift aisles.
How often should an ESD floor be tested after installation?
Test the ESD floor right after installation with a post-installation audit, before the area goes into production.
After that, test it again at least once a year and after any change that could affect grounding or floor performance, such as HVAC updates or grounding work. Check resistance to ground and, if needed, charge-generation/body-voltage performance using the footwear allowed in the space.