Surface priming helps concrete coatings bond to the slab. This guide explains why priming matters, how to prepare the surface, and what to check during application. Before work begins, ask your installer to confirm the specified primer, moisture-test results, and recoat window.
- Purpose: Primers penetrate concrete, creating a strong bond for topcoats like epoxy or polyurethane.
- Why It Matters: Up to 80% of concrete coating failures are due to poor preparation, including skipping primer or making other common coating mistakes.
- Benefits: Primers seal pores, block moisture, and improve the finish’s durability and appearance.
- Preparation: Clean, repair, and mechanically profile the surface before applying primer.
- Application: Apply evenly, avoid puddles, and let it cure fully to prevent common concrete coating defects like bubbles or delamination.
Proper surface prep and priming are critical to achieving a durable and long-lasting concrete coating.
What Happens If You Skip Priming
Skipping primer isn’t a corner worth cutting — it’s the fastest way to turn a coating project into an expensive redo. Without a primer layer bonding the topcoat to the concrete, failures show up fast.
Delamination within months. Without primer, there’s nothing for the topcoat to grip. Homeowners who skip primer on painted concrete steps report flaking and peeling within 3–4 months. On garage floors, the timeline is similar: topcoat separation begins in as little as three months when no bonding primer is used.
Hot-tire pickup. This is one of the most common garage-floor failures — and primer is your best defense against it. Hot tires can exceed 150°F, softening traditional epoxy and breaking its mechanical bond with the slab. The coating literally lifts off the concrete wherever tires rest. Hot-tire pickup is fundamentally a bond failure: the coating separates because the concrete wasn’t properly profiled or primed to create a lasting grip.
Blistering and pinholes. Without primer sealing the concrete’s pores, the slab keeps breathing after the topcoat goes on. Moisture vapor rises through the concrete, gets trapped beneath the coating, and forms bubbles, blisters, or tiny pinholes as it tries to escape. On slabs with hydrostatic pressure issues, this damage accelerates — up to 12 gallons of water per 1,000 square feet can move through a slab daily.
Wasted topcoat. Unsealed concrete drinks up expensive coating material. Primer fills the pores so your topcoat stays on the surface where it belongs, preserving its thickness and performance.
Bottom line: primer is the cheapest insurance policy in concrete coating. Skipping it saves an afternoon and costs you the whole floor.
Benefits of Proper Surface Priming
Better Adhesion and Longer Lifespan
Primers are essential for creating strong chemical and physical bonds with concrete surfaces. They penetrate the porous substrate, forming a bond line that secures the topcoat in place. Victor Pachade, National Sales Manager at Smart Surface Technology, explains:
"Without it (bonding primer), there’s nothing for the coating to grab onto".
This bond is key to durability. Skipping a bonding primer can lead to topcoat failure in as little as three months. Low-viscosity primers are especially effective for weak concrete, as they seep deeply into the surface, reinforcing loose fibers and reducing the risk of delamination. Beyond improving adhesion, primers also play a vital role in managing moisture.
Sealing Pores and Blocking Moisture
Primers act as a barrier against vapor transmission, helping to prevent issues like blistering, bubbling, and delamination caused by moisture. They also stop efflorescence – those unsightly white mineral deposits left behind when groundwater evaporates on the surface.
By sealing the concrete, primers ensure that the topcoat stays on the surface instead of being absorbed into the material. This not only preserves the protective layer’s thickness but also makes your investment in the coating more efficient. In short, primers provide an affordable way to guard against moisture damage while enhancing overall performance.
Improved Appearance and Performance
Primers don’t just boost adhesion and control moisture – they also elevate the final look and quality of the finish. By filling small cracks and surface imperfections, they eliminate common coating defects like pinholes and fisheye patterns that can occur when concrete "breathes" during application. According to Bob Harris from the Decorative Concrete Institute, primers also improve the spreadability of the topcoat and provide more working time during application.
The end result? A finish with uniform color and texture. For weak or dusty concrete slabs, primers consolidate loose particles, creating a solid surface that can handle traffic and temperature fluctuations.
Ready to Protect Your Floor?
sbb-itb-a0e5ae3
Preparing Concrete Surfaces for Priming
Cleaning and Degreasing the Surface
Before applying primer, it’s crucial to thoroughly clean the concrete surface to remove oils, grease, dirt, and grime that can prevent proper bonding. Pressure washing with a surfactant is often the best option, as it not only cleans deeply but also reveals any loose or damaged areas that might need repair.
Acid etching doesn’t remove petroleum or vegetable oils — it only creates a surface profile. As Concrete Network explains:
"Acid etching is meant to create a surface profile not clean the concrete. To clean or degrease concrete use specialty cleaning products".
After cleaning, perform a water bead test. If water beads up instead of soaking into the surface, additional cleaning is necessary. If you’ve used acid or chemical cleaners, neutralize the surface to avoid bonding problems. Proper preparation is essential – about 98% of the work in ensuring a successful coating application is in the prep stage.
Once cleaned, address any surface damage to maximize primer adhesion.
Repairing Cracks and Damage
Before priming, repair all cracks, holes, and damaged areas. Remove any unstable or hollow sections of concrete, using a hammer test to identify delaminated spots. For ridges or projections over 1/16 inch, grind them down to create a smooth, even surface. Clean debris out of any cracks and fill them with a patching compound that matches your topcoat.
John Reynolds, a technical expert at Brickform, highlights the importance of this step:
"You have to get down to bare concrete. If you don’t, there’s a good chance your overlay, stain, or sealer won’t bond properly".
Allow repair patches to cure according to the manufacturer’s guidelines. If you’re using bonding agents, avoid leaving puddles, as excess liquid can interfere with adhesion.
After repairs, it’s time to create the right surface profile for primer penetration.
Mechanical Profiling for Adhesion
Achieving the correct surface texture is essential for strong coating adhesion. Mechanical profiling removes the weak, powdery laitance layer, opens the pores of the concrete for better primer absorption, and provides the rough texture needed for a durable mechanical bond.
The profiling method you choose should match the thickness of the coating. For light profiling (Concrete Surface Profile [CSP] 1–3), diamond grinding works well, as it removes thin coatings and high spots. For medium to heavy profiling (CSP 3–7), shot blasting is the go-to method, as it cleans and textures the surface while preparing it for most applications. For heavy-duty tasks, such as removing thick resin coatings, scarifying can achieve a CSP of 6–9, though it’s often followed by shot blasting to smooth out the loosened surface layer.
Mechanical profiling is far more effective than acid etching for removing petroleum-based products and oils, especially on industrial floors. After profiling, ensure the concrete has a compressive strength of at least 3,626 psi and a pull-off strength of 218 psi or higher to guarantee a successful coating application.
Primercoat Application – Applying the Primer Coat on Your Concrete
How to Apply Concrete Primers
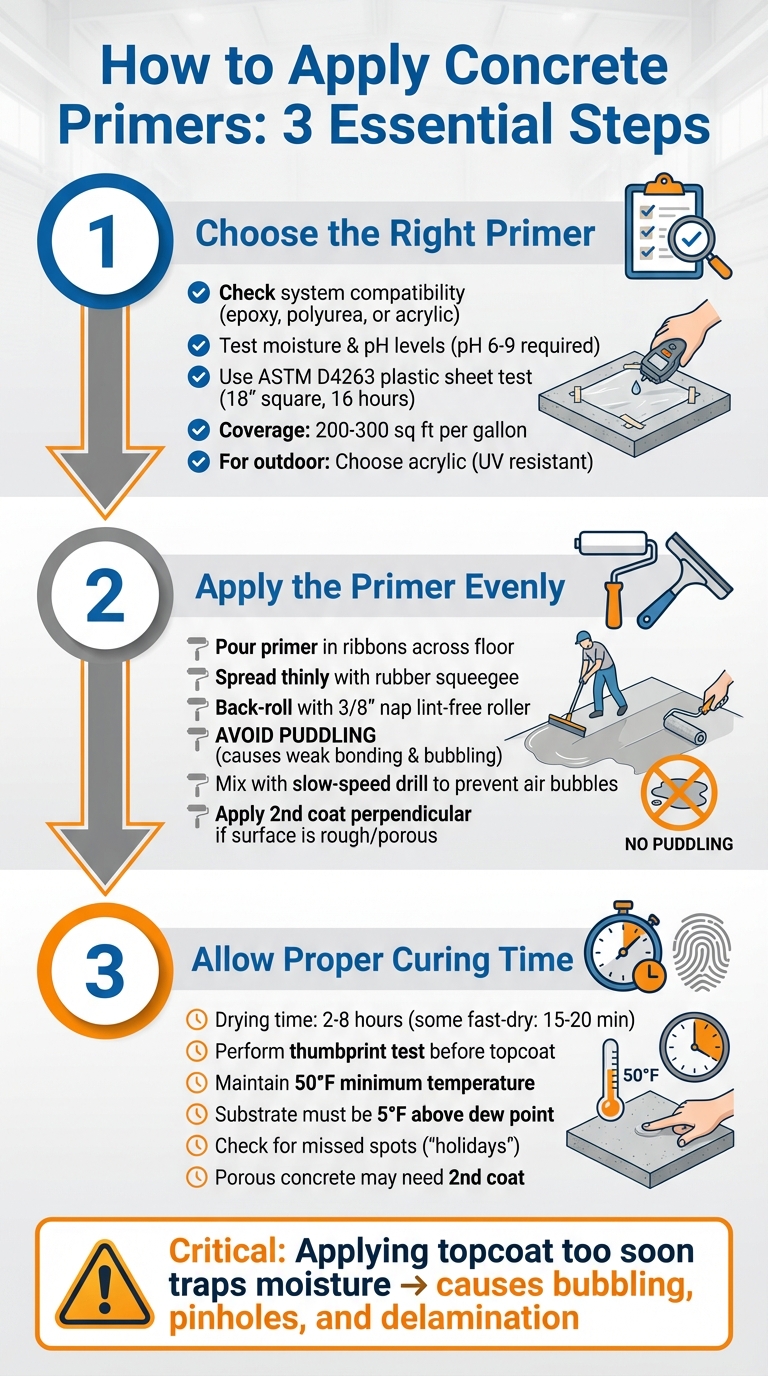
3-Step Concrete Primer Application Process for Durable Coatings
Step 1: Choose the Right Primer
Picking the right primer is all about understanding your project’s needs. System compatibility is key – your primer needs to match the topcoat you’re using, whether it’s epoxy, polyurea, or acrylic.
Don’t skip checking moisture and pH levels. Use the ASTM D4263 plastic sheet test (tape an 18-inch square of plastic to the concrete for 16 hours), and ensure the pH falls between 6 and 9 for proper adhesion. For outdoor use, acrylic primers are a better choice since they resist UV yellowing more effectively than epoxy. Standard bonding primers generally cover 200 to 300 square feet per gallon. For heavy-duty systems like Croc Coatings’ Penntek Evolution – designed to be 4x stronger than epoxy – always follow the manufacturer’s primer recommendations to ensure the best bond and durability.
Types of Concrete Primers
Concrete primers aren’t one-size-fits-all. Each type is formulated for specific conditions, topcoats, and environments. Choosing the wrong one can undermine an otherwise well-prepped floor, so it pays to know what’s available.
Acrylic/Latex Primer
Best for: Painted concrete, outdoor surfaces, and DIY projects.
Acrylic primers are water-based and low-odor, making them the most homeowner-friendly option. They resist UV yellowing — a critical advantage for patios, porches, and any concrete exposed to sunlight. Acrylic primers bond well to previously painted surfaces and work with water-based acrylic topcoats. They’re not the right choice under epoxy or polyurea systems, where a reactive primer is needed for a chemical bond.
- Dry time: 1–2 hours at 70°F
- Recoat window: 4 hours after dry
- Coverage: 300–500 sq ft per gallon
- Compatible topcoats: Acrylic paints, water-based floor coatings
Epoxy Primer
Best for: Garage floors, basements, and any surface getting an epoxy or polyurea topcoat.
Epoxy primers are the workhorses of concrete coating. They penetrate deeply and cure into a hard, chemically resistant layer that bonds tenaciously to both the slab and the topcoat. Moisture-tolerant epoxy primers can handle slabs with moderate vapor transmission — up to the industry limit of 3 lbs per 1,000 sq ft per 24 hours per the Calcium Chloride test — making them the go-to for basements and slabs without a vapor barrier underneath. Two-component (2K) epoxy primers create the strongest bond and are required for professional polyurea and polyaspartic systems.
- Dry time: 4–8 hours at 70°F
- Recoat window: Typically 12–48 hours; check manufacturer specs
- Coverage: 200–300 sq ft per gallon
- Compatible topcoats: Epoxy, polyurea, polyaspartic, urethane
Polyurethane Primer
Best for: High-traffic commercial floors, chemical-exposure areas, and flexible substrates.
Polyurethane primers offer high flexibility and superior chemical resistance. They handle thermal expansion and contraction better than rigid epoxy primers, making them ideal for outdoor commercial spaces, cold storage, and surfaces subject to frequent temperature swings. They also cure faster than epoxy, which shortens project timelines. Their chemical resistance makes them the right call for workshops, auto shops, and any floor exposed to solvents or oils.
- Dry time: 2–6 hours at 70°F
- Recoat window: 6–24 hours
- Coverage: 250–400 sq ft per gallon
- Compatible topcoats: Polyurethane, polyaspartic, epoxy
Masonry/Bonding Primer
Best for: Old, porous, dusty, or weak concrete that needs deep consolidation.
Masonry primers are formulated to penetrate deeply into compromised concrete — the kind that’s been around for decades, has a chalky surface, or crumbles under foot traffic. They’re thinner than other primers by design, allowing them to soak into the slab and consolidate loose particles into a solid, paintable surface. Behr’s Concrete & Masonry Bonding Primer, for example, covers 350–500 sq ft per gallon and is ready for topcoat in just 4 hours. These primers are ideal for basement floors, old garage slabs, and any concrete that’s too porous or friable to hold a coating on its own.
- Dry time: 2 hours at 70°F
- Recoat window: 4 hours after dry
- Coverage: 350–500 sq ft per gallon
- Compatible topcoats: Acrylic, epoxy (check manufacturer compatibility)
Quick-Reference Comparison
| Primer Type | Dry Time (70°F) | Coverage (sq ft/gal) | Best Topcoat Match | Best For |
|---|---|---|---|---|
| Acrylic/Latex | 1–2 hr | 300–500 | Acrylic paint | Outdoor, DIY, painted concrete |
| Epoxy | 4–8 hr | 200–300 | Epoxy, polyurea | Garages, basements, professional systems |
| Polyurethane | 2–6 hr | 250–400 | Polyurethane, polyaspartic | High-traffic, chemical exposure |
| Masonry/Bonding | 2 hr | 350–500 | Acrylic, epoxy | Old, porous, dusty concrete |
Once you’ve selected the right primer, the next step is applying it evenly to achieve a solid foundation.
Step 2: Apply the Primer Evenly
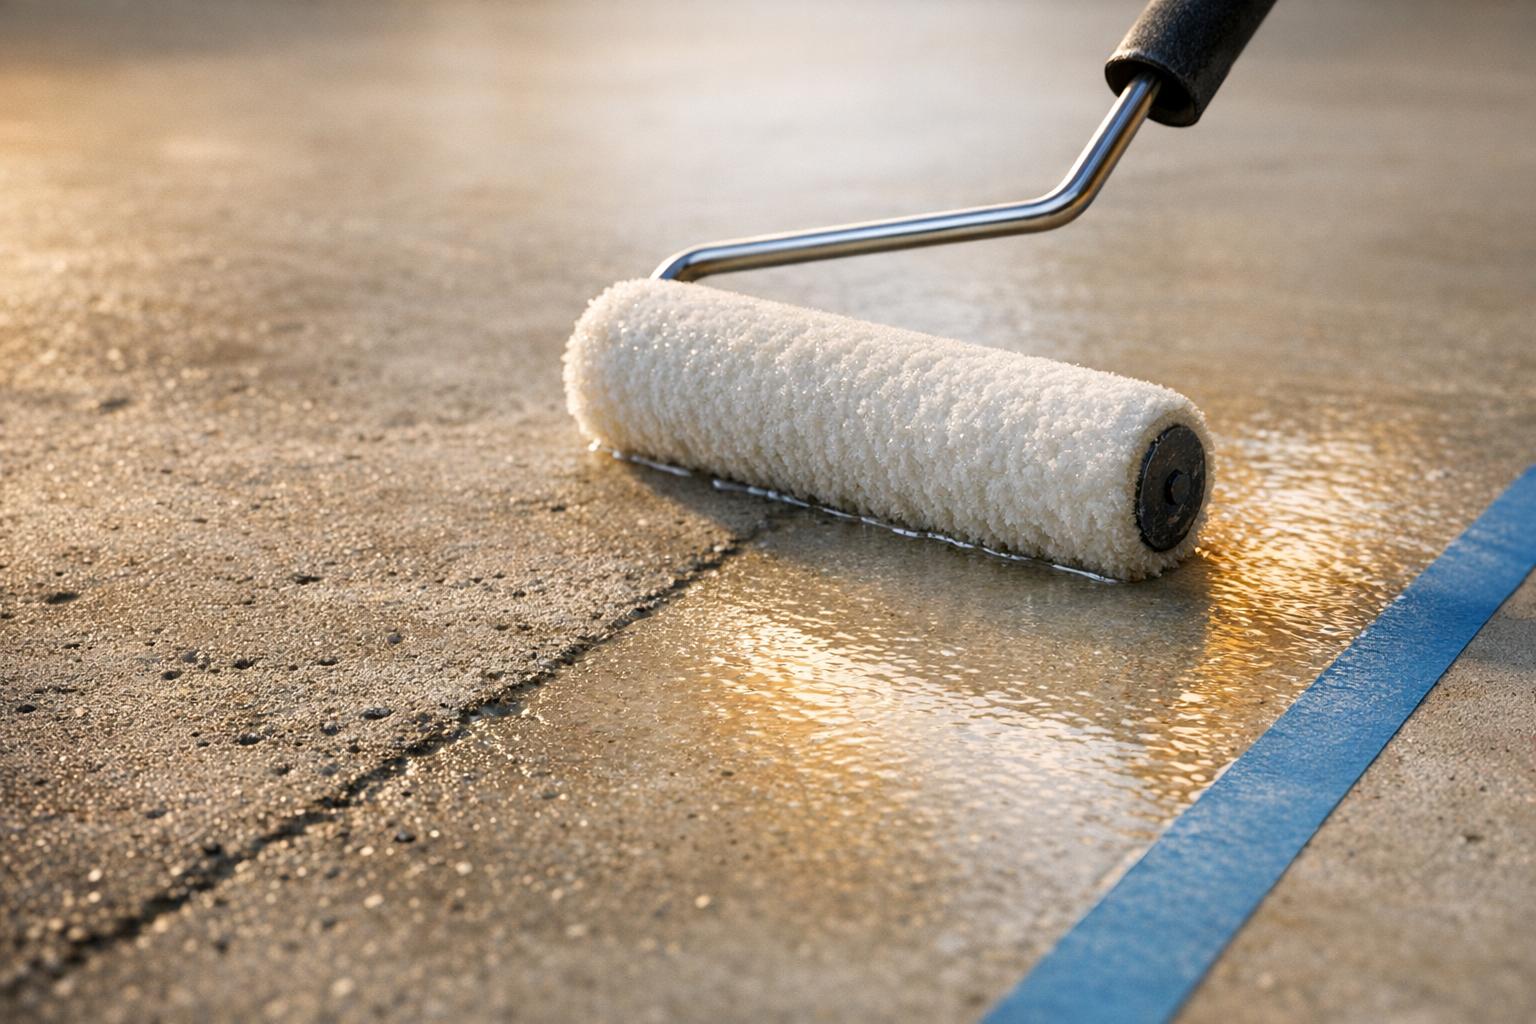
Start by pouring the mixed primer in ribbons across the floor. Use a rubber squeegee to spread the primer thinly and evenly, then back-roll it using a lint-free roller, like a 3/8-inch nap phenolic core or microfiber roller, to smooth out the layer.
Avoid puddling at all costs. Oversaturated areas can lead to weak bonding and bubbling during the curing process. If you’re working with rough or porous concrete, apply a second coat perpendicular to the first after the initial layer has cured. When mixing the primer, use a slow-speed drill with a birdcage or Jiffler mixer to avoid whipping air into the mix, which could cause pinholes. Only mix as much primer as you can apply within its pot life to prevent waste.
After applying the primer, it’s crucial to let it cure completely before moving on to the topcoat.
Step 3: Allow Proper Curing Time
Drying times for concrete primers can range from 2 to 8 hours, though some fast-drying options are ready in as little as 15 to 20 minutes. Letting the primer cure fully is essential – applying the topcoat too soon can trap moisture, leading to bubbling, pinholes, or even delamination.
To check if the primer is ready, perform a thumbprint test to confirm it has dried to the manufacturer’s specifications. During both application and curing, maintain air, surface, and material temperatures of at least 50°F. Once the primer is dry, inspect the surface for any missed spots or "holidays." Porous concrete may need a second coat to prevent issues like outgassing.
Common Mistakes to Avoid During Surface Priming
Even with the best intentions, certain missteps during surface priming can undermine your work. Here’s a closer look at some pitfalls and how to avoid them.
Skipping Surface Preparation
Neglecting proper surface preparation is a surefire way to invite coating failure. Primers need a roughened, clean surface to bond effectively – they simply won’t adhere to smooth, dusty, or contaminated areas. If the surface isn’t mechanically profiled to remove laitance (a weak layer of cement fines) and contaminants, the primer bonds to debris rather than solid concrete. The result? Delamination becomes inevitable.
Want to catch hidden contaminants? Try the water test. If water beads up instead of soaking into the surface, it’s a sign of sealers, oils, or grease that must be removed through degreasing or mechanical abrasion. Additionally, any surface protrusions over 1/16 of an inch should be ground down or scraped off to ensure an even primer application. Remember, inadequate surface prep is behind up to 80% of coating failures.
Ignoring Moisture and pH Testing
Surface preparation alone isn’t enough – monitoring moisture and pH levels is equally critical. Skipping these tests puts the entire coating system at risk. Trapped moisture beneath the coating can create hydrostatic pressure, pushing liquid upward and causing bubbles, blisters, and eventually delamination.
High humidity and improper pH levels can disrupt primer curing and adhesion. To put it in perspective, 12 gallons of water per 1,000 square feet can move through a concrete slab daily due to capillary action. While standard concrete slabs require at least 28 days of curing, moisture-mitigating primers can sometimes reduce this waiting period to just 10 days. Testing ensures you’re not setting your project up for failure.
Applying Primer Incorrectly
Uneven primer application is another common issue that leads to weak spots. If puddles form and dry, they create fragile areas that won’t support topcoat adhesion. Similarly, missed spots or overly thin coverage on porous surfaces can fail to seal pores, leading to outgassing, which causes pinholes and bubbles. A technical study on water-based epoxy primers found that diluting the product to 45% solids produced a film thickness of just 37 microns (1.5 mils) – far too thin to support weak concrete. This can result in issues like "hot tire pick-up", where coatings peel off under heat and stress.
"Applying overlay over wet primer (when not specified) can trap moisture, cause bubbles, prevent bonding, or even delaminate the system." – British Concrete Polishing
Temperature also plays a crucial role. The substrate should be at least 5°F above the dew point during application and curing to prevent moisture from condensing on the surface, which can weaken adhesion. Additionally, applying a topcoat before the primer has fully cured can trap solvents or moisture, leading to osmotic blistering and bond failure. Proper technique and timing are essential for achieving a flawless finish.
Conclusion
Key Points Recap
Surface priming plays a crucial role in ensuring durable concrete coatings. It forms both chemical and physical bonds that secure the topcoat to the concrete while sealing pores and controlling moisture vapor pressure. Skipping this step can lead to coating failures.
Mechanical profiling is essential for opening the concrete’s pores, allowing primers to penetrate effectively. Additionally, preventing moisture-related coating failures through testing is vital to avoid issues that could compromise the coating’s performance.
Common mistakes, like rushing through surface preparation or uneven primer application, can result in costly failures. Always inspect concrete for moisture and alkalinity, apply primer evenly, and follow the recommended thickness. Skimping on these steps can lead to problems such as hot tire pick-up or premature wear.
These steps highlight the importance of thorough preparation and careful primer application to ensure a successful and long-lasting finish.
Croc Coatings‘ Expertise in Concrete Coatings
Beyond these essential practices, professional expertise can make all the difference. Croc Coatings specializes in delivering durable, high-quality finishes using the Penntek Evolution system, which is four times stronger than traditional epoxy. Serving North Idaho and Eastern Washington (including Spokane and Tri-Cities), their certified team handles every detail – from moisture testing and mechanical profiling to precise primer and topcoat application.
With a one-day installation process and a lifetime warranty for residential projects, Croc Coatings eliminates the guesswork from concrete coating. Their team ensures the right primer is selected based on your concrete’s specific conditions, applied at the correct thickness, and properly cured before the topcoat is added. The result? A professional finish that stands the test of time.
FAQs
How do I know if my concrete needs a primer?
To figure out if your concrete surface needs a primer, start by assessing its condition. Here’s what to look for:
- If the surface is porous, smooth, or previously coated, priming can help ensure better adhesion.
- Cracks, contaminants, or high moisture levels are also signs that priming will be beneficial for durability.
- For new concrete that’s less than 28 days old, cleaning and testing for moisture might be necessary before applying a primer.
By carefully inspecting the surface, you can decide whether priming is the right step for your project.
What primer should I use for my topcoat and moisture conditions?
The choice of primer hinges on the moisture level in your concrete and the type of coating system you’re using. If moisture is a concern, a moisture-tolerant epoxy primer is your best bet. It’s crucial to test the concrete’s moisture levels beforehand and select a primer that pairs well with your chosen topcoat. A well-applied primer not only improves adhesion but also boosts the durability of your concrete coating.
Can I topcoat the same day, and how do I know the primer is cured?
Most of the time, you can apply the topcoat on the same day, as long as the primer has fully cured. For many primers, such as epoxy or penetrating sealers, curing typically takes around 6 to 8 hours at 70°F. To confirm readiness, check that the surface is dry, clear, and no longer tacky. If more than 24 hours have passed since applying the primer, you might need to lightly sand the surface to ensure proper adhesion. Always refer to the manufacturer’s guidelines for exact curing times and preparation steps.
What’s the difference between concrete primer and concrete sealer?
They serve completely different jobs, and confusing them leads to coating failures. Primer is a bonding agent — it grips the concrete below and gives the topcoat something to hold onto above. It’s applied before the color coat or topcoat. Sealer is a protective top layer — it goes on after the finish to guard against stains, water, and wear. Primer penetrates and bonds; sealer sits on top and shields. Using sealer where primer belongs means your topcoat has nothing to bond to. Using primer where sealer belongs leaves your floor unprotected from traffic and spills. In a complete system, primer goes first, then the coating, then — optionally — a sealer.
How much primer do I need per square foot?
Coverage varies by type. Acrylic and masonry primers stretch the furthest at 300–500 sq ft per gallon. Epoxy primers cover 200–300 sq ft per gallon because they’re applied thicker for a stronger bond. Polyurethane primers land in the 250–400 sq ft range. For a standard two-car garage (roughly 400–500 sq ft), budget two gallons of epoxy primer or one to two gallons of acrylic/masonry primer. Always buy 10% extra for waste and touch-up — running short mid-application means a rushed trip to the store and a potential recoat-window miss.
Can I epoxy over fresh concrete?
No — and this is one of the most common mistakes new homeowners make. Concrete must cure for a minimum of 28 days before epoxy, polyurea, or any impermeable coating goes on. By day 28, roughly 95% of the excess water has left the slab, according to Sherwin-Williams. Applying epoxy too soon traps that moisture, where it creates vapor pressure beneath the coating and causes blistering or full delamination. For critical jobs, run a moisture test to confirm levels are safe — the Calcium Chloride test should read ≤3 lbs per 1,000 sq ft per 24 hours — before applying anything.